Monday, 8 April 2013

Unit 9: Adaptation - Driver UV Maps

Hello Everyone,

Got 3 big updates to post today so I'm going to be flying through quite a few of these. First and foremost is the Driver UV Maps which I completed last night. I am pleased to say it didn't take as long as expected but to avoid overlapping there was a lot of cutting involved. The main issue I wanted to avoid this time was the pulling of seems. It was present on my Charles model and I hated that when I painted his lips it looked as though he had been dabbling with cherry aid. I think I ironed out most of the issues with this mesh but there may still be some in other places.

I thought I would knock this up as it is a stepping stone for the development of my Driver Model. Half the battle here is sitting down to execute the post but I guess it looks kind of impressive, well from my point it does anyway. I also have the final low poly Driver to post up which should follow this but I will say here and now that I have yet to execute the textures as of yet. I am not just poly painting I am going to be getting normal maps too, which will involve me sculpting detail into him at the higher subdivide and porting it down to bake it into the maps.

Anyway I will stop the waffle time to get down to it!
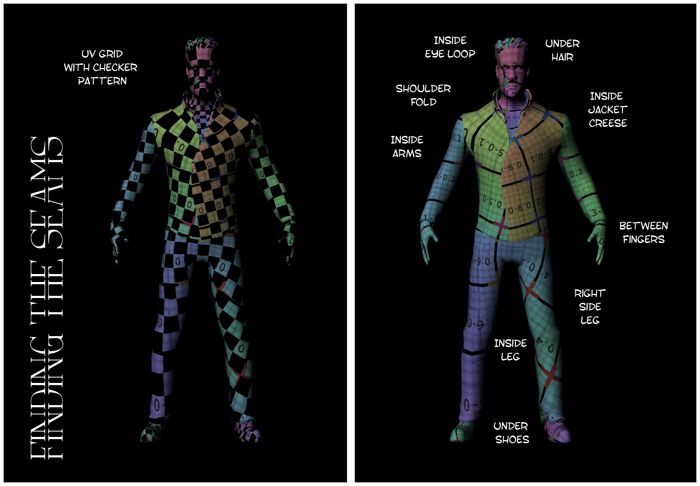

The "Finding the Seams" image above basically lists the places where I have placed the seems of the mesh. I also did a test checker pass which I draped over the top just to show how they react to its placement as well as the actual UV Grid. The only seam I was a bit unhappy with was the opening of the trousers on the left side as it is a bit out in the open but the trousers needed a good place to open from it was one side or the other basically. The mapping of the arms is what probably took the longest as I had to situate them on the inside and detach the hand uvs to unwrap them.


The "Driver UV's" video was just a little extra that I thought I would show those that are curious as it animates the mesh to its UV Form. I did it a few times just so it worked probably the ZBrush intro can drag on a little if people are not careful. I think I forgot to mention above that this video was recorded in ZBrush, not sure if there are any that are aware of ZBrush's built in recording system which is also pretty awesome... Maya needs something like that. Anyway I am happy to report that everything has ported perfectly into ZBrush so I will be having fun today :)
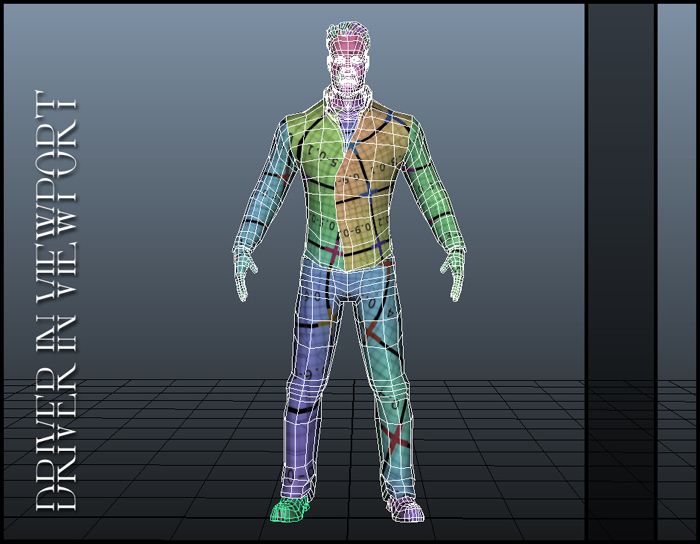

I also did a quick grab of the Driver in the viewport with his various maps, I had yet to notice at this point that one of the seems had overlapped another but luckily that's been corrected now. Probably wouldn't have noticed if I didn't have to do this post. I'm just kind of hoping that when I paint this guy I have no problems, I really hate stretching on skin especially on exposed areas such as the face which are really key to spectacular characters. The jacket will probably be a small issue as it was with Charles which I have only just noticed is identical Jacket wise but my hands are better :)
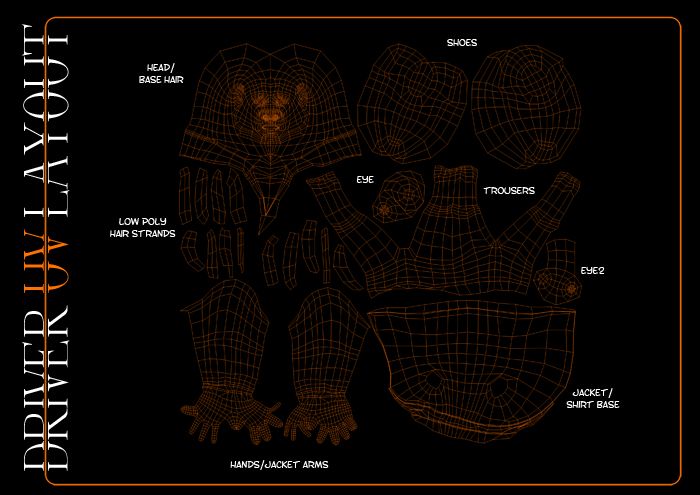

Last but not least my "UV Layout" for the Driver which I adopted an orange theme for kind of to tilt my hat to ZBrush. I have also labelled the areas of the mesh which correspond to different parts of the Drivers actual mesh which can also be seen in the ZUV Video above. The hands basically encompass the entire sleeve but are etched in as to keep everything relatively low. I tried merging everything together but it was costing me detail in different areas. Still the brief for a games character can be generated in separate pieces or a 1 piece mesh so I am happy with that.

Well that's it for this post, I will say one thing though to Alan who probably thinks I have forgotten about making Tris in the areas where I know my characters joints will go. Don't worry I have not forgotten I am just doing this rendition for conceptual purposes my final Demo Reel Driver will be accompanied by all his corresponding triangulated joints as requested by the brief. Once I have come to a final version it have the correct triangles. Just thought I would get that out there in case he is shaking his head at my incompetence lol. Anyway I think that does it!

Catcha Later!
xXStItChXx

Friday, 5 April 2013

Unit 9: Adaptation - Driver 2D Turnarounds to 3D

Hello Everyone,

Well I am a man of my word, spent most of the day getting my Driver's attire correct or as close as I can to correct. Based on my 2D image planes, the only thing I could not get completely correct was his shirt under the Jacket. I may have to readdress this but for the meantime its in a good place for me to start playing around with poses. This post is about my image planes predominantly and how they map out compared to the modelled 3D geometry. I also incorporated some of my know-how from Justin's classes to experiment with Silhouettes and other little bits and pieces.

What I was quite amazed by was the final poly-count of the Driver model which at present comes in at around 3380 polygons all in. The file of the .obj file for porting into ZBrush clocks in at around 573kb which I don't have to tell you is so tiny. I love how these files translate when kept low poly they are just so nice to move around. Having done many low poly assets in the past it is quite a breath of fresh air to finally get into some low poly character stuff. I have done a number of things in the past mostly objects though which is not as cool as a character not that his jacket wasn't a nuisance.

Anyway lets get onto the 2D - 3D turnarounds.


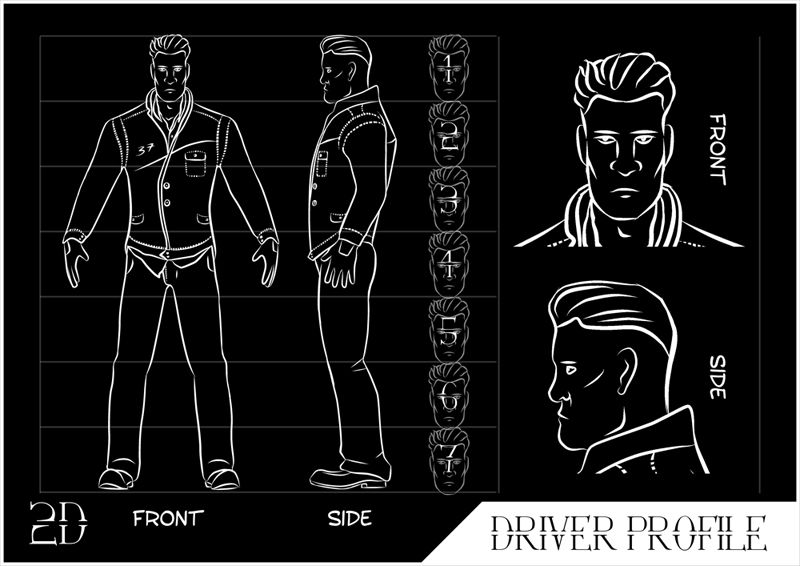
The image above shows the 2D Driver Profile which I divided into two categories the key proportions of the body with a close up of the head. I used these to create my models, facially not much was altered as this had already been determined in ZBrush. This was mainly about getting his proportions somewhat liken to the chosen proportions I executed earlier. It is for this reason his upper body is predominant while his lower is kind of skinny. I added details to the turnarounds mainly as placeholders for texture mapping which will be coming shortly.


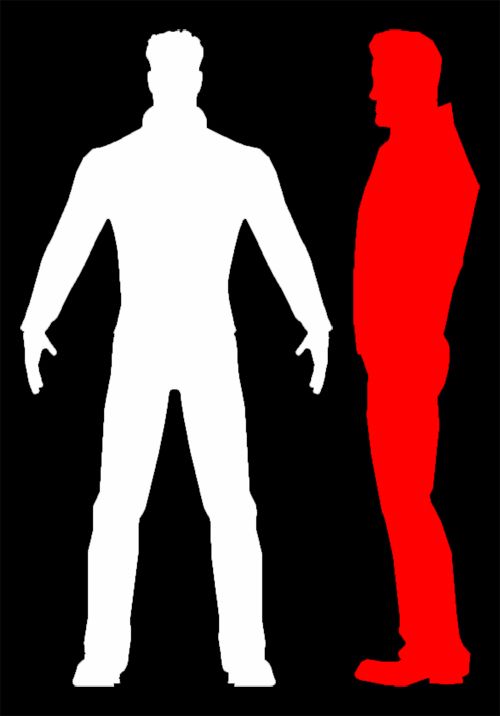
The Silhouette imagery above believe it or not is how the final proportions of his turnaround body were decided. I stripped away all of the detail and just focused on the size of his various areas. I am particularly proud of the side profile I knocked up which initially came from tracing the head sketch I knocked up earlier. I created an S curve to locate the areas of Drivers body to make sure he wasn't falling or placing his weight in a way which would make the model completely shocking. The shoes were made easier by this process also, I hate foreshortening literally it can be a complete pig.


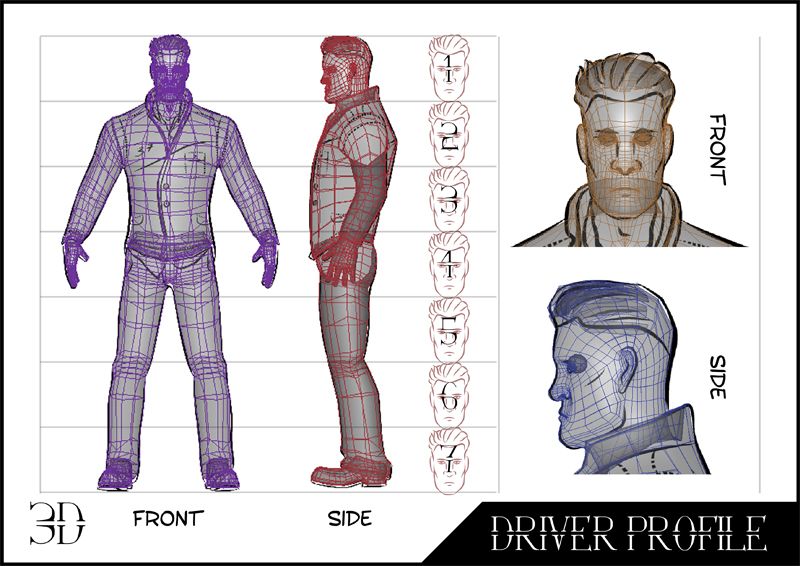
The 3D Driver Profile (image above) shows the 3D geometry placed over the top of the image planes I was particularly proud of how accurate I managed to get this. It took quite a while to find my way to achieving these results but they are there. I can divide this mesh to a tune of 13, 000 polygons at subdivide 2 and bring myself in a little more detail. Still its nicer to be at sub divide 5 and place wrinkles and other bits and pieces to eventually forge into a normal map. Then you bring it down to subdivide 2 and put it in the texture channel.


Last but not least is the finished result or what I'm calling "Driver Planes to Model" just giving people a bit more of a look at the end result really. I have two more models to build once I have this little guy put away but I think I am on a decent track now. I really just have to sit down and knock out a few final details to be able to post up Stage 2 stuff for the cars. The environment I am working on but to be honest that is my biggest Achilles heel an environment is just too large for me but I will get something together so I can complete the final picture.

When I do sit down to do the cars they will probably be solely built in Maya using image planes, I am lucky that they are both closed top cars. This means I can avoid little details of the interior or the cars. Plus its low poly so the simpler they can be the better. If there is any need for little details to be tweaked once the final article has been built I can always normal map it in from ZBrush in higher sub division levels. I'm not sure yet it might just be an option should I need it. I kind of want my texture painting for these assets to be top notch so Z might still be my way for poly painting needs.

Anyway the post is done, lets get down to more!
xXStItChXx