Monday 20 May 2013

Unit 9: Adaptation - One Last Pose...

Hello Everyone,

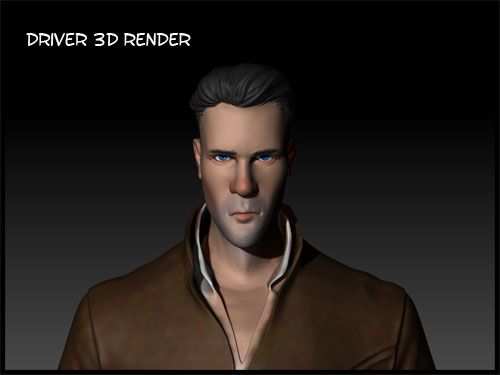
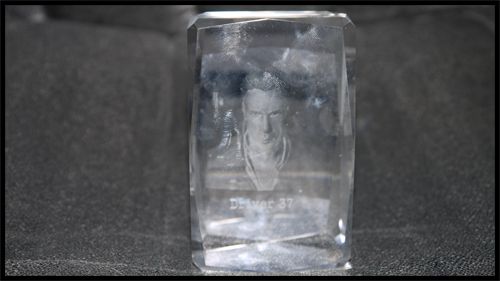
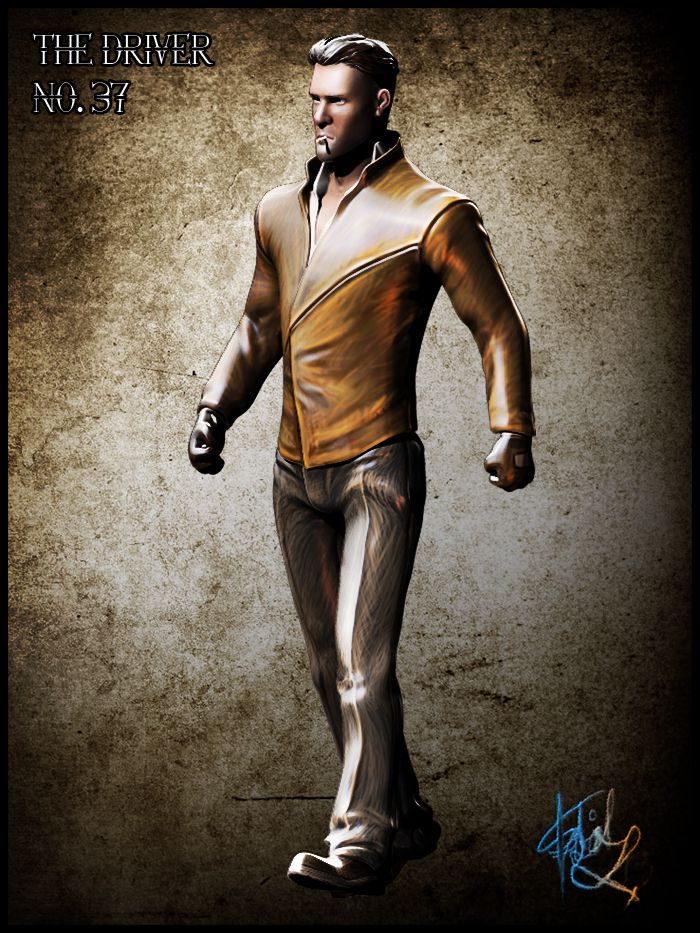
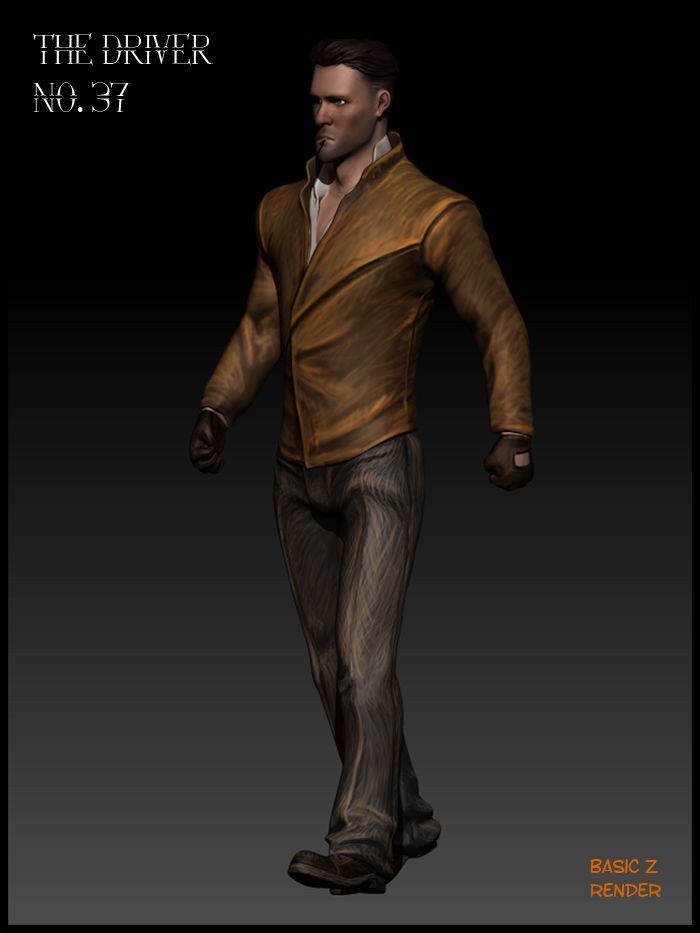
I bet by now everyone thought I would be gone in the wind but alas I am still here providing a little update. I was asked to submit a decent high res image of my Driver to Phil and well I wanted something a little more dynamic this time round. So today I set myself the task of posing the Driver once again this time in a much more difficult way. I made it my mission to make his body curve with an arm something that was not easy. I'm still not sure its 100% correct now but I am quite happy with the image I got at the end of the fireworks.

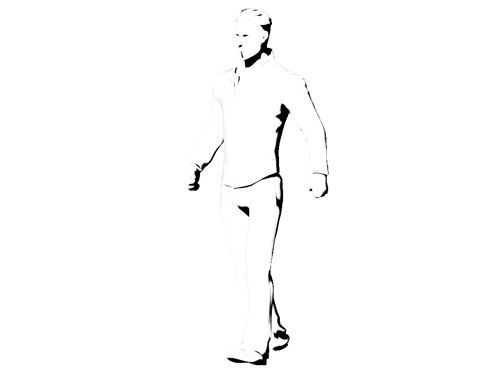
I decided the high res image I was asked to get warranted a post it note and you know how I get once something is on a post it note. I committed a portion of the day getting it right in most of the areas but It didn't just begin with a pose idea. I had to research the pose and then recreate the pose in a 3D medium... Something I haven't used much before - Daz Studios... a free piece of kit that allows you a fully rigged male/female character to pose and adjust. Once I knocked out some decent renders the proceedings moved into ZBrush for the transposing and general moving of low poly vertices...

Let me break down my journey for the following pose...

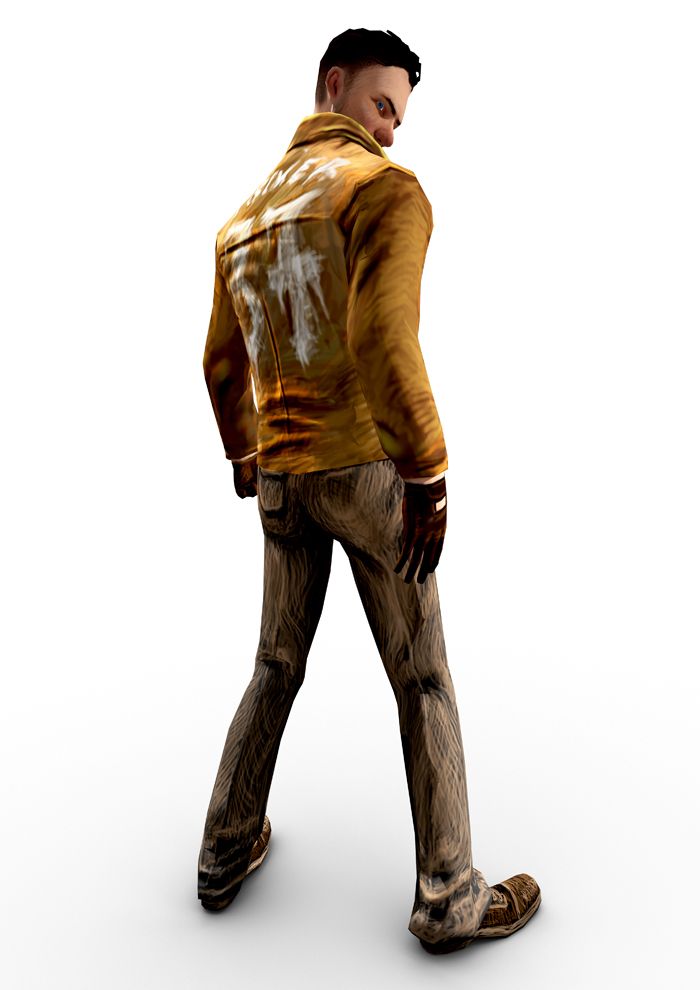
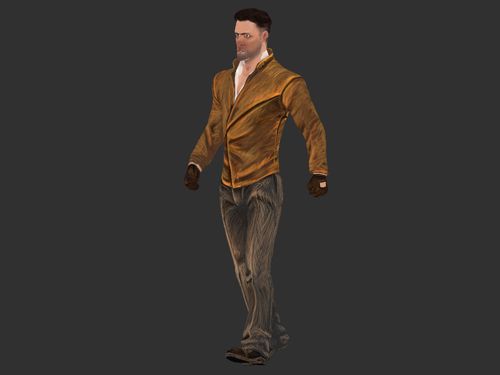
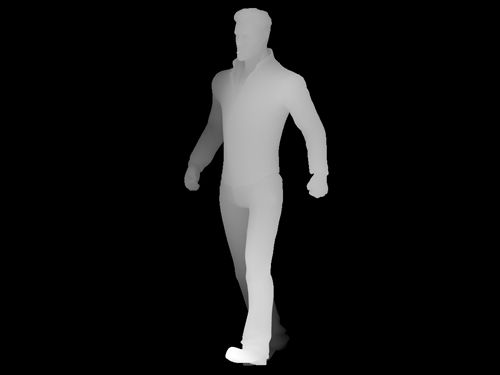
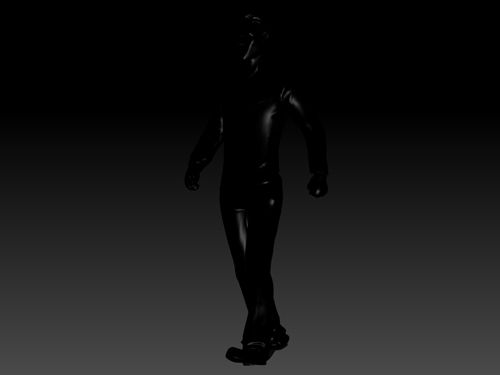
The image above shows the final pose I created with a little research and quite a bit of test rendering. I was torn between wanting to show his face and wanting to show the iconic "Driver 37" Jacket so I found myself trying to sit in-between the two. It created the image above of course scaling was also an issue... I have never rendered out an A3 image from Maya so it was trial and error. Plus the image size goes out of the viewports range so you cannot see how far out you are until you render. (Alan if there's an easier way let me know). Regardless we got there in the end, Driver on an occlusion canvas. It just makes it feel as though he is on the ground and not floating...


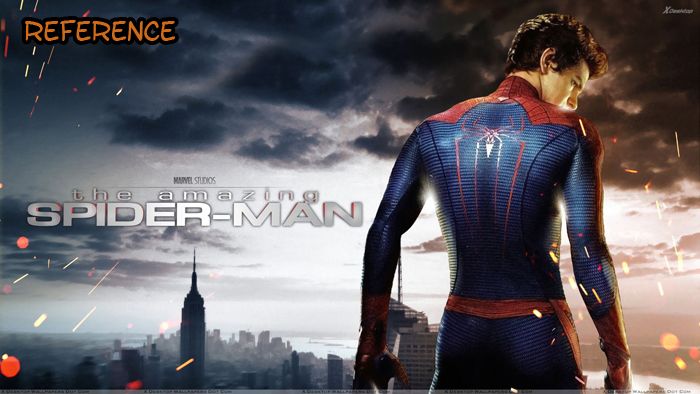
The image above shows the reference imagery I used to create my pose ironically it is probably the only thing I like about the new Spiderman... Cool pose. The only problem I found with the image was it cut his legs out so I kind of have to assume how they would go. This warranted some further development in a program I was otherwise unfamiliar with until today really... Of course what I hadn't banked on was a few little hiccups within Daz... The controls can be weird if you don't know what you are looking for... Either that or I had a weird day... could be either...


These were a couple of development steps I made in trying to recreate the full spider-man pose in Daz. They are in order so I began with A and ended on C but I liked the idea of one hand being open and the other balled into a fist. Before you say it and I know someone out there will at least think it I did not choose to make him naked. I am not a pervert, so just calm down and enjoy the rest of the post. Basically I needed to appreciate the anatomy in order to attempt the pose on Driver. It's also because I have yet to figure out how to operate clothes in Daz... lets move on...


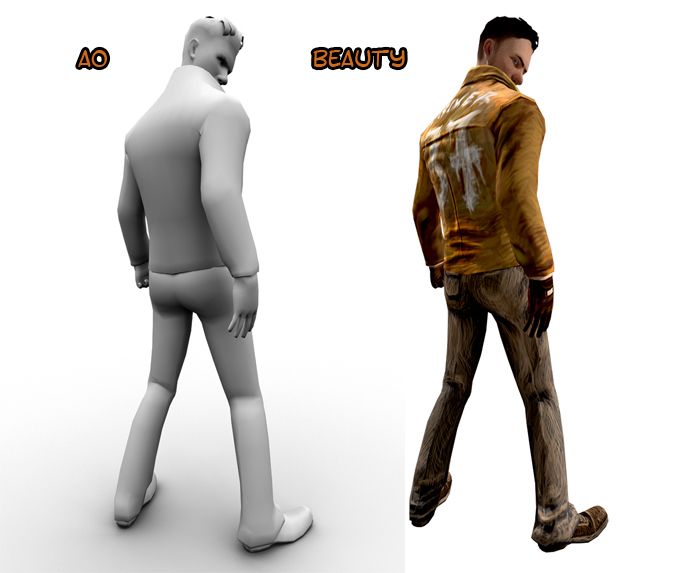
Next is a bit of render pass action (you knew I was going to do it). I figured I only really wanted 2. It does me no use to create a million passes for what I want to keep low and cool looking. I wound up not using the AO map on the Driver but merely using the Driver on the AO map... In other words the AO map doesn't affect the texturing of the render at all. I put the Beauty over the top without a blending mode. The only thing I wanted the AO for was to give him some ground which I was forced to keep in another wise white environment... What can I say I couldn't resist - he needed grounding.


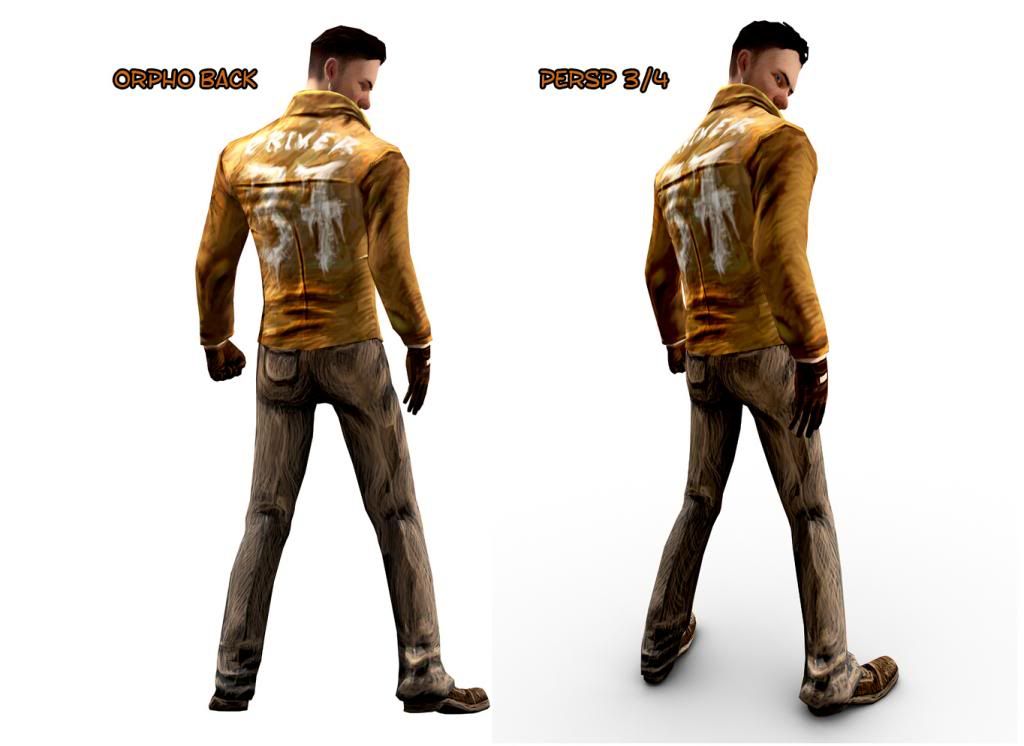
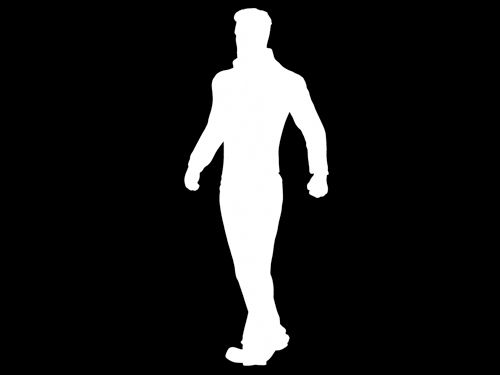
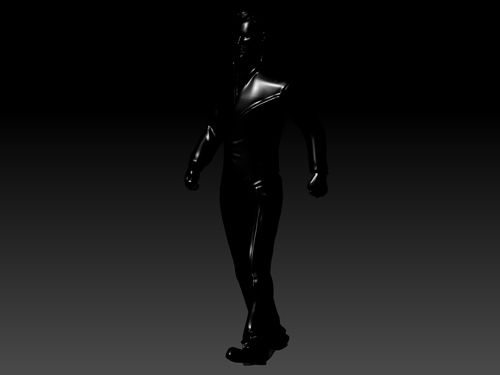
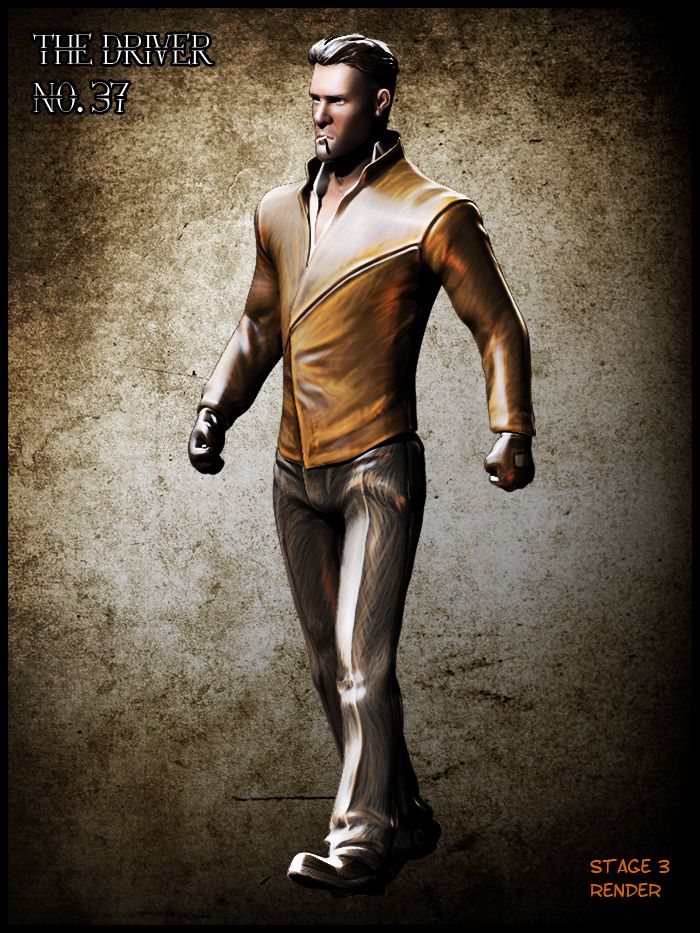
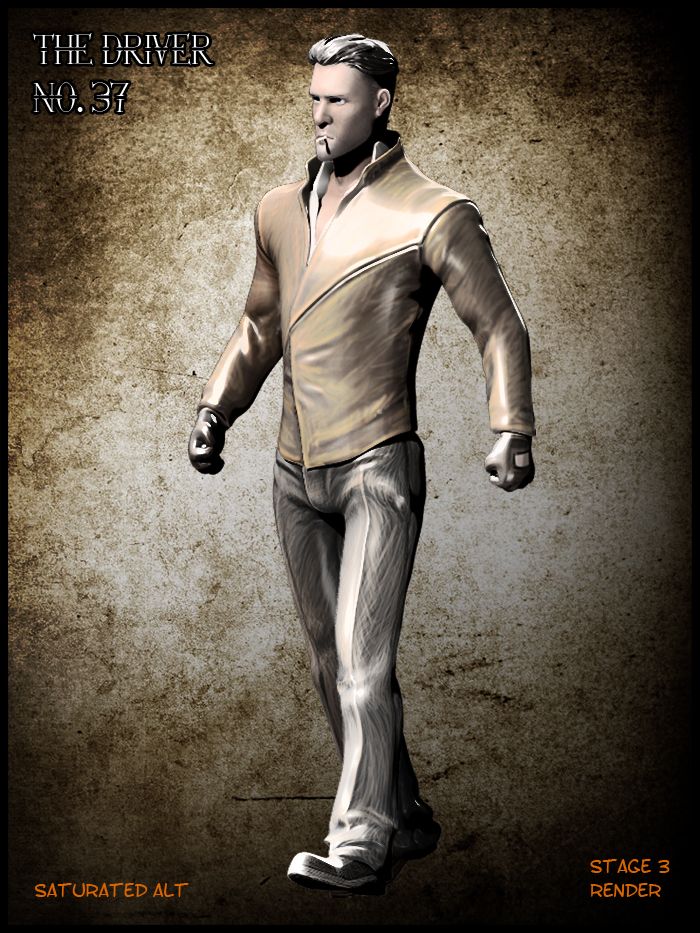
Next are just the final results again. I am quite fond of the Orthographic back mainly because again it grounds him pretty well. Either way I think I will send Phil both of these I just can't decide but the 3/4 pose is certainly dynamic so maybe that. I also love the little amount of AO shadow under his feet, really does give some depth to the floor. It will be quite nice to look at this and know its low poly and I hardly did anything to it for it to look cool other then render it in Maya with mental ray. I can remember having a discussion with Alan about getting decent renders from Maya I guess I've been a noob...

I had started making videos of this process but in this instance I didn't really see a point, there is quite a bit of admin in placing videos. I guess at the end of the day I felt the post with images was enough without having to see a couple of ins and outs. I am hoping that this pose is liked I did screw around quite a bit to get this pose to work and look dynamic. I kind of like that his face is hidden it really does feel like a pose he would pull. That's what was rubbish about the poses I made in the past for this guy... They looked okay but they just wasn't him... I like this pose... It feels like a pose the Driver would pull...

Anyway, Ill be sending these over in a bit Phil :)
xXStItChXx

Friday 17 May 2013

Unit 9: Adaptation - Time Management - Deadline Complete

Hey People!

I have been putting off this post, I guess because my mind is still a little glued to this project but the show must go on. For this project I set out to prove...something maybe that I still had a little magic hidden in the joints of my bones. I have done 45 posts for this Unit and racked up an insane image count on photo-bucket (204 images - my personal best). My video count on YouTube has gone up 50 videos some fair play are Maya tutorials but you only really have to deduct 20 for that meaning I created 30 videos for the "Short Drive" project alone...

This is probably my largest submission to date and boy did I feel it ha-ha. I guess this Unit absorbed me a little more - kept me in check but now is my opportunity to kick back and relax a little. I still have a number of things going on over the summer - one being fixing my dissertation stuff as my grade from the proposal didn't satisfy me. I also have a couple of projects with my little games company so hopefully we will get something nice knocked up for those. I even have a little experience at a games company in London... looking forward to that :)

Anyway, I give you the end of Unit 9: Adaptation...


It has been a long 12 or so weeks since this project began, I got started a little late due to some personal concerns but I clawed my way back. The timeline was briefly extended on the board when I found that we had been given an extension beyond the original deadline day. Its actually kind of lucky that happened I'm not sure I would have had everything done in time otherwise. It's still kind of hard to believe that I am now over the half way point of my degree. It only feels like yesterday when I was hitting my head against a wall trying to do 750 drawings for my "Oafish Lamp".


For the most part I got everything done, I am still a little gutted that I didn't achieve the Maya Tutorials for a second term. I used to be so organised with them I guess I just keep getting carried away with the projects. Never mind though I will do the ones I missed over the course of summer and post them up on here. Before then though I will be taking a bit of personal time, I would like to see my dads plaque at some point which is at a golf course. I am going to have to play a game (I suck at golf) but I'll do it to salute my old man on the anniversary of his death...

Do not worry though I will be back before you know it hopefully with some more cool developments on various creative exploits. I even have a particular project in mind for the final year of our degree but I have yet to finalize it. When I have more to share on it I will give everyone a heads up but for now wait patiently (that's if you care ha-ha). I still have to send some high definition renders of my Driver to Phil at University for displaying him in all his glory. Don't worry Phil I haven't forgotten I just had to get these other bits out of the way...

Anyway stay cool everyone,
Enjoy the Summer!

xXStItChXx

Unit 9: Adaptation - A Short Drive - Final Demo Reel

Unit 9 - Adaptation
Subject Matter - James Sallis - "Drive"
Task - Creating Low Poly Games Characters/Vehicles
Setting - 1930s Chicago (The Great Depression)
 
Game Synopsis -

The drive was short but sweet, almost ideal. Deep down he wanted it to last a little longer as he had many times before. But this time it felt... different, adrenaline had slowed everything to a crawl. Driver knew why but he didn’t care. This was how it was supposed to be. Sitting back, a grin slid across his face as he anchored his foot to the floor. His unwelcomed passenger was less happy as he shot the Pontiac across the populated crossroads. For a moment he thought he’d lost this game of roulette. Then... “Smash”... he won.

A Short Drive Between Two Lives Full Demo Reel


Final Result -

3951 Low Poly Driver Model
3906 Low Poly "Night" Car Model
3226 Low Poly "Day Car Model

Final Thoughts -

It was nice to get in the mind set for what may be a future career. This Unit has helped me understand the creative methodology to achieving a high standard low poly model. It was also nice to get a chance to exercise my dark desires by the source materials noir undertones. All in all I enjoyed it and probably got a little too into it, to the point I couldn't turn it off... Here's to the next project!

xXStItChXx

Unit 9: Adaptation - A Short Drive - 3D Crystal

Hello Everyone,

Consecutive post number 2 reporting for duty, I just want to get things finalised today and I can think of no better way then sitting down and just cracking them out. These posts are my final touches to an otherwise successful completion of Unit 9 - Adaptation. These things are just extras as they are after the deadline and are more for my own piece of mind. I would think of myself as a heathen if I didn't share them with the world as I have become so accustom to doing. I would have knocked these up sooner but I have been doing a bit of tinkering around the house... It was sorely needed.

This post is about 3D Crystals one of my little "extras" which turns 2D images into crystallised 3D manifestations. Basically you send a photograph to a firm and they etch the pixels of the image into crystal creating a un-degradable photograph.  The image is also given dimension but it is not a complete 3D representation as the back is transparent. If anything it creates a kind of mask for the photograph meaning the back just shows the inside of the front of the face which essentially is the front of the face. Its cool and I got a light with this particular order :)

Anyway lets get down to the 3D Crystal!!

The image above is the front and side views of my 3D Crystal. From the front it looks like an image but you can turn it and it does provide dimension largely due to the side/depth. Of course the side is kind of an illusion because it can only go back so far before the image has to end. I had half a mind to enquire about sending 3D files to these companies but I'm not sure if they have the facilities to print full 3D geometry into Crystal. It's probably something I could ask in the future. I guess this time I just wanted to mix it up a bit and try something different from a marketing stand point...


The render above is the actual image that I sent the firm when ordering the Crystal. At this stage I hadn't finished the painting aspects but just wanted to order a 3D Crystal to see if it could work. I was pushed for time and wanted to send them something, I was hoping it would be here before Crit but deep down I knew it wouldn't be. Part of me wishes that I had ordered 3 Crystals each with different coloured lights to show the colour code of my 3 3D games models. Again this is something I could still go away and do but 3D Crystals are about £45.00 just for one... Quite pricey...


The image above shows the Crystal without any light other then my cameras flash. I probably should have cleaned it before taking this picture as you can see all of my finger prints. For those of you that do not know I always feel a need to try and take something physical from my projects. I like to be able to interact with what I create. Making something digital is one thing but physically holding something you created in your hands is another entirely. I will always strive to push this further and further... I have done it with viral books, rapid prototyping, t shirts and now 3D Crystals... I wonder what's next...


The image above shows what I received in the mail when ordering my Drivers 2D/3D bust. You basically get a little light stand that projects the light up into the Crystal. This illuminates the pixel etchings inside. You can get a better idea of this just by looking at the image at the start of this post. Its actually quite cool because you can see them in the dark and they are quite good night lights I don't mind saying. There is also the option for battery power should you need them to be portable which I imagine is a cool thing for displaying to clients or networking events even.

Its actually quite a cool things to own should you have the option to one day purchase one. I had the epiphany some time back when I went to Florida. They basically turned my ugly mug into a 3D Crystal and I really liked the idea wanting to go beyond the digital realm and more into physical creations. You can add custom text to the Crystal also should you have the need to lay out a message or in my case an illustration of his identity "Driver 37". All in all its another avenue for me to push my creative exploits in the near future... Very cool for a 2D image.

Over & Out,
xXStItChXx

Unit 9: Adaptation - A Short Drive - T-Shirt

Hello Everyone,

I am winding down to the last few posts for this Unit now (mainly because it ended the other week). Still I have taken the time to go back and correct a few things (creating a final demo reel also). I also have a couple of things that I ordered for the day of the Crit which meant they would not get posted up until after. My T-Shirt I wore on the day and my 3D Crystal didn't arrive until after the Crit which meant I couldn't show it on the day. Never the less I am here now with this little back log so I will post these up and then get back to mowing lawns outside (I have a large one to finish today).

The T-Shirt Design like all of my T-Shirts has always been a developmental step towards a completed project. They never sport the final renders or concepts but utilize some of the conceptual development. In this case of this one it shows my completed 3D assets but sadly without the wire as the poly-painting was not yet complete when I had to make the order. Every T-Shirt, Item, etc. has to be ordered a week or so before Crit to ensure it arrives in time. In this case I was lucky that my T-Shirt arrived the day prior to the Crit... I love cutting things close.

Anyway lets get to the details of the - "Short Drive" T-Shirt!!


Like my various Stage processes I thought I would do a pretty awesome comparison from concept to model to ME! The image above shows the completed design for the back side of the T-Shirt but also where the design came from. It originated with some "Stage 2" concept art which I spray painted onto my 3D model in ZBrush. I returned to the concept to create the design for the back of my T-Shirt as it is much higher resolution then the model. I still wish they would allow me to cover a T-Shirt with a custom design that way I could make a T-Shirt/Jacket... Oh well..


This is a better shot of the T-Shirt Design, I used a background less PNG image to crop a part of the jacket onto the back of it. I had to rub out/paint the edges of the jacket for it to flow into the T-Shirt. I made the colour of the T-Shirt brown so it would suit the Jacket colour more. There are also another couple of little custom features from the spread shirt website. Particularly the bulls-eye which felt right with the design (for anyone who has read the book "Drive"). I also added a couple of custom quotes and a little old school gamer font on the sleeve with the number "37" for my Driver.


Next the Front which has my low poly games meshes on it in contour render mode (illustrating their wireframe). I kept the colour codes which have been adopted throughout this entire project (The Driver - Orange, The Day Car - Red & the Night Car - Blue). I also fashioned a little custom logo with a bit of a vanishing point road design on it. I wasn't sure at first but I think it really has worked well on this T-Shirt. Part of me was afraid that it wouldn't be noticeable. Still It would have been nice to put the final Render of Drivers face on a Shirt... maybe that's next who knows.


Last but not least a podgy bloke wearing the T-Shirt (image above). I know I don't look too amused in this picture I think I was getting a little tired of taking photographs... There were lots of rejects for this post particularly. Design has never really been a big issue with me its something I came into this degree course already understanding somewhat. I think what I let slip this time was underestimating the time it takes to create something design orientated that is strong. I had the same issue with the Art of... At the end of the day its difficult to say what you include and what you don't...

Sure, when you don't have much work it is easy to say okay I will stretch this into a couple of pages or... I can use this here and that here. Of course when you have a lot of work things become difficult because you cannot really decide what makes the cut. I know that I was so rushed towards the end of this, I just prioritised the final elements. After all everything is shown across the months I have been working on this blog. The T-Shirt got a little side-tracked but I think the back of it is defiantly my most favourite factor. Anyway I hope everyone is doing good!

Take it easy people!
xXStItChXx

Friday 10 May 2013

Unit 9: Adaptation - Maya Dynamics Series 2

Hello Everyone,

Got a few of the Maya exercises done but after last week I've been pretty burnt out. I tried to get as many as possible but I didn't really even get to the end of this series... I will look into the rest of these over summer and do them devoid of the grade. They are valuable information and I completely get that. One of the main issues I have been facing has been towards the batch render system in Maya which keeps intermittently cutting my renders short. I have to keep reinitiating the batch render when it stops on random frames... These are just particle scenes mostly... So its not like I can delete the history of them...

Its been rather annoying dealing with this issue, luckily I didn't have that problem with my final turnaround renders for this Unit otherwise I wouldn't have had them to show on D-Day. Once I have done the rest of this series I will post them on this post in addition to the ones I have... Don't see the point of making a new post especially because I want to keep them in the series. I will do the rest of these videos (Dynamics 3 and the lighting ones particularly interest me) as well as the games character (something I'm getting the hang of... I think).

Well lets get onto the beginning of Dynamics Series 2.


The first video is directional control of multiple animated meshes. These are particles but you instance the particles to look like a particular mesh in the scene. I thought that was pretty cool especially since you can load an animation onto one and have it repeat in many. I prefer to think of these meshes as Lego doods, I think that's what I was thinking in one of the earlier Maya classes. Still I had a problem batch rendering this scene there is probably something wrong with my computer or my install of Maya...


Scale control is the alternating scale of sphere instance with a transparent blue texture. The bubbles run along a path which is an emitter is keyed to run along. As emitter sheds more spherical versions of itself an alternating scale control causes the bubbles to differentiate in size giving the illusion of realistic bubbles. There was a blue background on this video but rendering it in my standard .tif format has removed the background (as it does). A relatively cool thing to know, defiantly cool for underwater situations in CG...


The next video is rotating meteor clusters gradually drifting from a centre mass. The video is primarily about the rotation of each meteor which conducts its rotation randomly. The textures meteor shaped model were provided by the tutorial download on our online tutorial site. This video was quite a cool thing to know again particularly with graduating 3D objects. I really find the Dynamics tutorials interesting it would just be nice if I could figure out why the batch render is hating me so much right now....


Next the illusive object index control which randomises multiple meshes from an emitter. In the case of this video we have 4 shapes (in colours blue, red, yellow and blue) which differentiate randomly each time they are played. You can get the same kind of effect with After Effects randomised shapes, I recall doing a tutorial from my expression book which did a 2d scale/position. The real difference here is that you choose the meshes which become random. You could have the same kind of effect with different meteors which would make the video above more real...


The crowd control video (shown above) uses similar conventions to the shape video above and the meteor video above that. In this case however the emitter is a plane where random people shaped meshes appear at each play through of the animation timeline. Its quite cool but I don't like how they all just appear in this video. Would be much cooler if they grew out of the floor like trees (another video in this series). Every single rendition of each model is at a random rotation and random scale which creates a unique proportion every single time...


The next video is all about aim direction arrows which use velocity toe graduate downwards. The particles are instanced to points using the a designed mesh to project the geometry of each particle. The arrows all slightly differentiate but all follow a predetermined gravity field. The velocity is what causes the arrow to curve and fall downwards as a real arrow would. Without the velocity the arrows eject flat and fall flat without any realistic gravity. This is quite a cool thing to know, I'm pretty sure I've seen a 2D rendition of this... I have to wonder if someone used this and drew over it...


Next comes the Rocket video now again this works very much like the aim direction video with the arrows above this video. The key difference is the trails left by these red rockets which have a fog field that graduates them. The colour is also attuned in the settings. There has been some lighting placed in the scene also to give the smoke some realism. Every missile follows a gravity pull and velocity causes the mesh to arch before falling. I do like this video though, pretty cool seeing thousands of missiles going mad... ha-ha.


The rotation types video again functions like the two video above with the velocity and gravity settings. In this case the key difference is in the alternating rotation values of some of the arrows that eject from the object emitter. You will notice that some of the arrows move and look completely vertical, this is because they have been assigned (at random) a place to look at in 3D space. They all are looking at a value of 0,0,0 which is practically in the middle of the viewport in Maya. This is what is known as an expression... They influence most of these dynamics.


Next comes instances and paint effects. The trees in this scene were created using the paint effects in Mayas vast tree library. The terrain has surface deformation which was added by the pushing and pulling of the 3D plane. A texture mask causes the trees not to generate on the path (except for the sampler tree which I forgot to hide in the scene). On that note I will warn everyone that if you are doing an instance to HIDE THE ORIGINAL. It does nothing but sit in the scene if you are not careful. The plane under the grass is meant to be the dirt road...


This is the goldfish video which sees multiple copies of a goldfish be exported through an object emitter. The original fish had an animation set into its key-frames (much like the robot). In this case however a deformer was used across a 30 frame animation causing the fish to look like he is swimming in water. Sadly this video was another case of my batch render not completing. Usually it wouldn't be an issue in Maya as you can just start from a frame it stopped on. When it comes to particles though because it does things randomly the stills wont match up...

Well these are all of the videos I could muster up, sorry there are not more I guess I will have to work on learning them over summer. Apologies go out to Alan there, I guess I burnt myself out on other things... I knew the Maya videos would catch up to me eventually (as they always do). If you do read this Alan and have an idea as to why my batch renderer keeps stopping randomly I would appreciate the aid. I have never had these problems before and now its randomly doing it with every scene I load in... Anyway I'm going to go outside and shut my eyes for a bit!

Take it easy!
xXStItChXx

Wednesday 8 May 2013

Tuesday 7 May 2013

Unit 9: Adaptation - DVD Case, Display & CD Design

Hello Everyone,

I just got finished with my Disc stuff so I thought I would put that up, this is probably my most favourite DVD design I have done this far. It just looks wicked I wouldn't change a thing. Well we are on the last 100m hurdle now really. I have decided to crack out the art of next just so I don't have to worry about it later. The demo reel among other things will be done either in the early hours tonight or tomorrow morning. I think I have already mentioned I didn't think I would be sleeping and this has more or less just confirmed that little theory.

I decided to make this case design all about the Driver as he is the man for this Unit. I had a bit of an internal conflict because I really wanted to use his Jacket, I managed to find a better way of using the Jacket. I decided to stick with a the dark/orange theme with some blue tinted highlights here and there. This disc art is all about being rough in places and "sketchy" in others. It is probably what this whole adaptation unit has been about for me and my Driver. I need some R&R over the summer I think I may spend the first week just catching up with Z's.

Anyway please enjoy the submission disc artwork!!


Well you know I said I found something to use the jacket on? Well here it is the submission disc is all about the Drivers Jacket. One of my favourite concepts on my disc really chuffed to see it personally. I'm not sure if you can appreciate the logo of the game on the disc as it has to be small to fit on the damn disc. You also have a little preview of all 3 of my game assets underneath the hole in the disc. Yes that's right they are all together for the first time on my disc! I had to put them together post Maya for this concept but don't worry I will do a group render.


The case artwork is above... I know it is flipping sexy, I will be so happy if it prints out exactly like this. As you can see on the edges though I added a few little whiffs of colour just to get people feeling the textures of the Jacket and thus the models. The front image was a render which I did and accidentally stumbled into. Instead of post it up as another concept I thought it would be better to use it on something that needs doing. I think this is how I fell into the submission disc artwork earlier... Just playing around and before I know it I'm doing something else lol.


Last but not least comes the disc display stand. I couldn't help myself again. Each time I say to myself this display is a waste of time. Something else inside my head always talks me round to doing it for each unit... I told you I'm a fussy git. Now I cannot wait to see this disc artwork on my blog this is just the best one ever. For those of you that do not know about my fascination with sinister and dark stories I apologise for scaring you. This unit gave me the perfect excuse to get back into the darkness that drives me... Ha-ha... there's a joke!!!

Well hopefully the next thing you will see will be some turnarounds, I wont post the art of until the very last post which will be the red light post. I will do the art of before anything else though, I don't want to jinx my ability to get that done and dusted. I am so tired but still somehow my hands are moving so I must be okay. I may go next door to get a red bull in a bit, I really want to hit the next few hours hard. I hope all of you guys out there are having fun or if you are smart have already finished this project. I cant wait to be kicking back... I need me games!

Catcha Later!
xXStItChXx

Unit 9: Adaptation - Stage 3 Concept Day Car Weta

Hello Everyone,

I'm running on fumes but I still have some kind of rocket fuel in my behind my hands just keep moving so I guess I can survive a little longer. This is the very last development for individual assets. After this post we will be looking into sets and bringing everything together for a big hurrah. I couldn't let the Weta Stage 3 slip my notice having built 3 assets from the ground to stage 2... Its only right that I complete a Stage 3 for people to gaze at. Once again I will be listing all of the render passes and other bits and pieces that were used for a final Weta image.

If anything is stupidly wrong with this I apologise I have had little sleep in the last 3 days so just be aware of my insanity. I cooked up a load of render passes on my recently completed high resolution Day car from ZBrush. I threw them together on a background that worked to me and started mixing around to get a decent concept piece that would summarise the success that is the day car. I have done this for my other 2 models also but only now am I actually starting to get to grips with the practice. We will see what I can do with this approach in the future :)

Anyway lets get down to the final Weta Design Post!!


Above is the result of my render pass exploit (which is otherwise known as my "Stage 3 Concept for the Day Car"). The lights were a last minute throw in from Photoshop you got to love the colour dodge blending mode. I had to be careful with the amount of black in the scene largely because it kept making things too strong. To be fair though the amount of shadow on that side is just a reaction to the placement of the lights in the render passes. I had to dial back the strength a little with a few softer material passes which certainly de-grunged the image.


Probably wrong to call this video a posing video as a car is always pretty much posed by being stationary. Never the less the video above shows the car in ZBrush with its 3 lights illuminating it entirely. I put a Blinn material on the car this time as it really made the car reflect quite nicely, I just thought it was a cool effect for the video turn around really. Next came exporting the video which gave me a few problems, sometimes ZBrush just does not like you recording videos. I get the feeling it happens after extended use or if you record for too long.


2. BASIC RENDER PASSES

The basic passes can be seen above, (from left to right). You have the standard Flat colour pass which essentially is all of the poly painting for this model. The Depth pass distinguishes the distance of the model in 3D space. The shadow pass creates darkness where light cannot reach. The Occlusion pass emits depth from crevices, its kind of like a combination between depth and shadow. Last but not least you have masking which allows you to remove the background from each render image allowing you to place it on any kind of background.


3. DIFFUSE RENDER PASS

Next we have the Diffuse Render pass which essentially is your floor layer, every render eventually falls down on top of this pass. It is mainly because it is an empty model waiting to be filled with colour and shade. The light is already in the scene thanks to 3 point lighting. Its not much to look at I'll give you that but believe it or not the bottom one rarely is, it needs everything on top of it to be anything decent. You can actually appreciate the dents knocked into the higher resolution model. These were exported as normal maps and are present on the low poly model :)


4. LIGHTING RENDER PASSES

Next is the all important lighting passes, these could be seen in the Diffuse but they are much more noticeable on a reflective material. Basic Material 2 in ZBrush is the ideal candidate but you have to tweak the material in Z's Material Modifiers. The only goal in mind is to ramp the specular shine through the ceiling to make the model highly reflective to the light. In this case the Fill was particularly floppy, I may have done something wrong with the fill pass. Its virtually black, still it turned out okay in the end... It was just a bit more of a hassle...


STANDARD Z RENDER VS. ZRENDER PASS RENDER

As you can see though it just helps when you get to alter the layers yourself. It allows you more freedom changing aspects of an image via its passes. You can change opacity values, hue saturation values to name a few. I am actually quite happy with the result I got here, I felt there were no need for more then one. I like how the image looks now. The lights just make it look even more epic. I will have to do more experimentation with this method over the summer. My business partner has tonnes of Z-Models for me to do my little tests on... This will be very fun making things pop!

Well I will miss this little car but not as much as I will miss the Driver. I may be cheeky and see about rigging him at some point. I've never had a games character mesh to use... UNTIL NOW. Will be nice to see if I can actually achieve a good result. Well I think the next moves are to get cracking with the Art of Document... I figure if I crack that our quick then I can sit down and take my time with the final demo reel stuff. I could do that or I could get the demo stuff done and do the Art of Later... Not sure, I will be up with another few posts today though... That's for sure!

Over & Out,
xXStItChXx

Unit 9: Adaptation - Day Car Textured - Complete

Hello Everyone,

I am back after having waged a war throughout the night to get to the day... Ha-ha that sounded cooler in my head (Its a gag about my day and night cars). I have managed to get the little beast completely textured. Every single element is entirely hand painted. I have many things to do today so I probably will be missing another nights sleep tonight. Peh who needs sleep when you are churning out fun workload right? Anyway this post is about the Day car with a couple of videos that I remembered to record throughout the painting/texturing process... It's gonna be cool don't worry.

Texturing only took a long time due to the amount of sub tools that I broke the model into from my UV coordinates in ZBrush. It has its advantages and obvious disadvantages. The advantage of it is you can freely isolate 1 section of the model and rotate round it with complete freedom. The disadvantage is you have to paint everything individually meaning you cannot take advantage of symmetry. Its also a blow because you have to reattach the model once it is in Maya. And if you are a stickler for 1 UV map like me then you also have to paste all the UVs into one image... the same with the normals...

Anyway allow me to introduce you to the illusive "Day" Car.


The image above shows a high quality render from Mental ray. Before you say anything yes I know its a dark scene. This is just so it is in keeping with my other posts which were also set in similar dark scenes (the Driver included). Having a darker scene also allows me to take advantage of the headlights on each of these cars. Rest assured I will be doing a very small "Day" set meaning I will have to get my head around day lighting in Maya. For the moment though just let me enjoy the victory and accept the day car how she is :)


The videos above show a few of the development steps toward the final render. They are mostly just texturing and poly-painting entries. I didn't feel it was necessary to capture me painting every single one. I am just looking to keep things interesting not dull by recording hours of me building something. I even sped these videos up slightly so they did not drag for too long. You can imagine these were not 5 minute paint jobs. After painting each one I had to export it and its UVs and dump everything into Maya and merge it back to the main body... It was tiring.


The image above shows the UV maps used in this model. There were ambient occlusion maps baked into these textures that helped give them some additional depth. The occlusion took the lighting from an overhead spotlight. The sections of the map are as follows - UV - basically the texture coordinates and the wire of each polygon. The 50/50 is a screen of the wire onto the texture map. The DIF is the texture map on its own and last but not least... The NRM is the normal maps which use the camera to create the illusion of surface deformation (This could be bumps, dents, anything).

The image above shows the turnaround of the "Day" car. I decided to try something a little different lighting wise for this render. Ambient wasn't cutting it so I got 4 spot lights on each side of the car to try and keep as much of it illuminated as possible. The glass in the windows and in the front lights are separate material shaders. They use the same textures essentially but the lights have a slight glow and a higher incandescence. The glass for the windows just has higher reflectivity then the body of the car. Its not entirely noticeable on this render but trust me its there...

This car took me all day and night yesterday to get ready for today. This is mainly due to everything having to be hand painted. The lack of symmetry also didn't help matters much. I think it turned out okay though I mean this car doesn't look bad for the lowest poly in my entire list. At 3200 polygons it feels alive. I really am liking the richer colour of it too. I know it could be considered a sharp yellow now, washing it out just felt wrong... like it was losing its vibrancy. Its a banana car that has been in a in a really damaging car wreck... Last but not least... I love my windows...

Take it easy!
xXStItChXx

Monday 6 May 2013

Unit 9: Adaptation - Day Car Low Model Complete

Hello Everyone,

I'm still here fighting the good fight. The only thing left to finish is the Day Car, I also have a little environment to try and setup. Hopefully I will have time to knock something together. Anyway this post is the low poly rendition of my "Day" car. I have done a number of posts on the Driver since his low poly completion and of course the "Night" car has also had some chit chat. The next phase for this model is to get it normal mapped and texture painted by today at the very latest. I need most of tomorrow to knock together my Art of Document... Something tells me its gonna be big.

This model is a little slapped together polygon wise mainly because I have been working on other bits and pieces. Still it is not a bad little model, if I have time in the future I may return to it just to tweak some of the geometry I'm not very happy with. Fundamentally though this model is the lowest model I have created. If I can make this car look amazing under lighting I will be very happy at its lowest divide it clocks in at 3225 polygons. Which is 800 odd less then the Driver. After all to me the entire point of this project is getting something to look awesome with a minimalistic poly-count...

Anyway lets get down to the Day Car :)

These are a couple of passes I knocked out as I have for the Driver and the "Night" car. I just think it looks cool to see everything in all its glory. The UV's were quite simple this time round which I am very happy about as I wasted a Day on the Night car correcting flipped UV coordinates. The wire simply shows how basic the model is under its shaded skin. I kept the geometry simple but that inadvertently cost me some rear lights which I know were on cars back then. I had the same issue with the Night car I have been spending too much time looking at the front of the cars DOH!


Next is the obvious step bringing the Car into ZBrush for some tender love and texture care. I managed to find a quicker way of grouping the car this time there is a button for doing it via UVS. This has saved me breaking it up myself as now the model is in bits as required. The only problem with doing it this way means I will have to piece it back together bit by bit. I had this problem with the Night Car. You have to export every individual tool and its UV and then join up all the UVS and everything. Its a nightmare and takes time but I should be able to do it by today... if I work flat out.


Next is my UV painting test (you are getting a sneak preview of the cars texture so don't tell anyone!!) I'm relatively happy with the style of the car I just have to make it pop in a few more areas. I don't want to have to do too much messing around with the textures after ZBrush. Everything should look better here when I start doing my higher normal detailing. At the moment the car looks flat because in truth it is. I have to add the normal that don't make it look flat. At the same time though the lighting in the paint needs to be right... If worst comes to worse Ill bake an ambient map on...


The video above shows the Day car High/Low turnaround comparison. This video also demonstrates a few extra details (namely the vertice count and tri count). Before you ask the model is meant to look asymmetrical because one side of it is smashed in... I have to add dents to my poly-paint too another one of the reasons tackling this car has been tricky. The front right side of the model is dented in to accommodate a crash of sorts. This is due to my (fictional) games story it is a car that has driven into a wall and into another car... The front is smashed in...


Last but not least comes my comparison between two poly-counts. My ceiling is the Sub 6 ridiculously high 3290112 poly model for normal mapping purposes. My actual model is the sub 1 3225 poly model it is my mission to make this car look awesome low. I do this comparison mainly to show the difference between the two levels. In this more noticeably you can see the front curve of the car showing its lower poly count. It has to be said that things are simpler when lower in poly and render times are much less of a chore... The key is to find the middle ground.

Hopefully my next post will be about the successful completion of the low poly rendition of this model. I want it to look good so there has to be some consideration for quality, of course I cannot get carried away and forget about the D-Day. I will find a way of getting this there, I have come this far. I have just waffled down my last slice of cold pizza, I have a can of red bull pepping me up. I have a bottle of water handy for tired eyes. I can do this :) I hope everyone out there has enjoyed this Unit as much as I have, it was a tricky beginning but the end will be epic!!!

I'll catch you guys later on!
xXStItChXx

Sunday 5 May 2013

Unit 9: Adaptation - Stage 3 Concept Driver Weta

Hello Everyone,

I am back with a my last bit of Driver development! Hip Hip Harrah! Nah I will miss working on this guy it has to be said... He has made the cars enjoyable to model because I am retroactively thinking of design choices that I know he would have. Now this post is another Weta concept which I have replaced my stage 3 drawings with. Basically it is a series of render passes that individually export layers of a scene (for example shadows, depth). They can all be edited individually, Weta is the practice of creating a concept from Renders that can be adjusted in Photoshop.

I did a Weta concept for my Night car which was a little bit of a flop due to its darkness. I told the masses there was no time for a reconsideration sadly. In this case I have kept things brighter and followed a couple of online tutorials for layering Z Render passes. I have formulated a couple of final versions just to see what the masses think (if anything). This post will illustrate the passes used and the end results achieved. I have also thrown a video in for good measure of the model prior to its journey into the Render land.

Okay lets get onto the fun part :)


The image above is what I managed to achieve from following a couple of online guides. Basically you have to create a number of different light passes along with the standard render layers. The background is a paper texture I took from Google which I felt kind of went with how he looks. The pose was one of my many reject poses that I didn't want to throw on to the in scene Driver. As a concept however the pose has come up pretty nice. You would not believe the hell I went through in bending each one of his fingers... It took so goddamn long...


1. POSED & TEXTURED MODEL

The video above shows the pose I made in ZBrush, I thought it would be best to show this now before you guys begin to unpick the journey the image at the top took. Now nothing is particularly wrong with the render passes from ZBrush which more or less add a decent amount of depth/shadow and occlusion. Still it is nice to have a play with the individual layers because you can do so much more then what a standard render engine does. You can tweak the colours and the intensity of the dark. It allows you to customise everything if you take the time to put it together...


2. BASIC RENDER PASSES

This Weta concept began with the a basic flat render directly from ZBrush giving me the colour values from my Driver. From doing a BPR render in ZBrush it creates the other passes with a standard render so you don't have to mess about making each one. Just click the ones you want and there they are. The ones it made were the Depth. Shadow, Occlusion and Mask. Now usually I have tonnes of masks and for good reason they allow you to isolate areas on the body... In this case due to time I kept the mask count to a minimum and rubbed out areas I didn't want on the layers.


3. DIFFUSE RENDER PASS

Next came the diffuse which essentially requires you to fill your mesh with white and a basic material (no reflectivity). Prior to this I was advised to setup 3 light sources for the concept. There is a key light which emits the front of the Driver. A rim which outlines his shoulders and an area behind him. Last but not least comes a Fill light which fills the character a little kind of like an ambient light. These are all in the render above though probably not overly noticeable I guarantee you they are noticeable in the final conceptual renders.


4. LIGHTING RENDER PASSES

Next comes the Lighting Render passes. I mentioned these briefly above, basically they illuminate parts of the model. They can be as strong or as dark as you like. The key light is the far left as you can see it covers the chest area of my model. The fill is in the middle slightly dimmer then the other 2 to provide a go between. The rim is the far left illuminating the back side of the Driver. These are all done on a black model... why you ask? Because when you lay them over your other passes in Photoshop the Black goes transparent... Leaving you with a white shine...


STNDARD Z RENDER VS. ZRENDER PASS RENDER

As you can see from the results above the render from ZBrush is still quite nice but the render layers really make something pop from the image. This is largely due to little tweaks you did not know made a difference to a render. I could have tweaked it a little more had I actually had more time on this stage. Alas there are other things that need my attention, still I am happy with the result I achieved on a pose I otherwise hated. In this context though I think it works, he looks like he's about to go and hit someone ha-ha.. I put the cigarette in too!! It is textured you just cant notice in the scheme of things...


ALTERNATE VERSIONS OF STAGE 3 DRIVER

Last but not least I'm putting up 2 other versions of the Driver which I made just altering the settings slightly and adding an extra beauty on top. The saturated look blends with the texture more then the other image but it loses its sharpness. For the normal alternate I placed a beauty version of the Driver on top of the other layers and just knocked the opacity down. Again it does still pop but not as much as the shiny version. I am unsure here but never the less they are certainly not black nor do they lack depth so already I am one up on the night cars Stage 3 submission.

Well I think I will saver the taste of this last Driver post before the big Crit presentation. I still have to fit all of this work into a damn PDF document yet. Luckily I have the rest of today and tonight to get other things finalized. I'm just worried not sure if I will have time to craft any complicated environments, there just isn't enough time. I still have to get the Day car going which hopefully should be done today at the very latest. Still at least this post makes me one post closer to the end of this battle. Not that I won't miss seeing the Driver in his wicked Jacket :)

Anyway take it easy people!
xXStItChXx