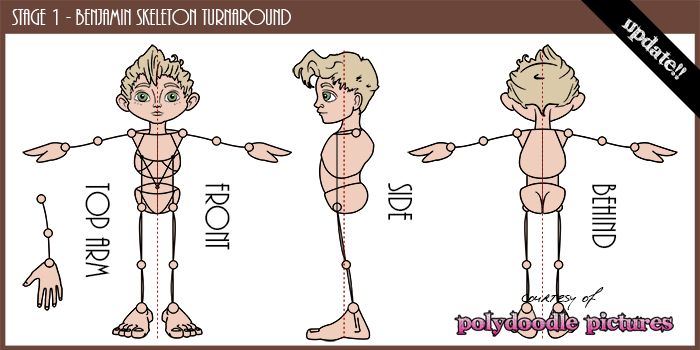
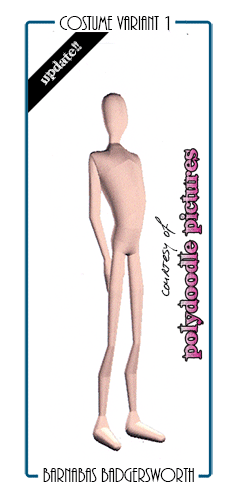
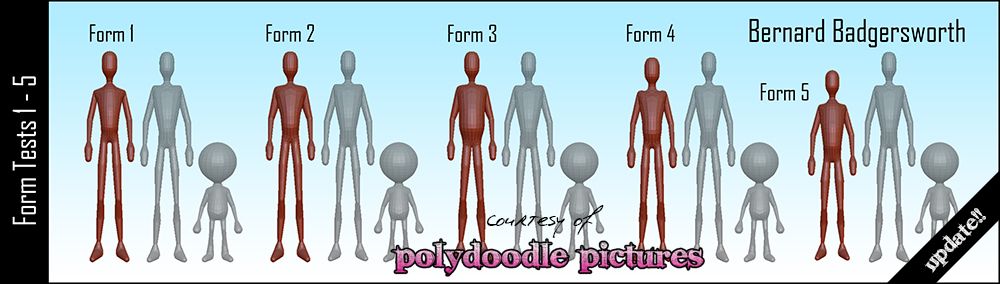
Here is a sample extract from my latest contribution (30/12/13) direct from Polydoodle Pictures Studio Blog. The image below shows the framework for my final turnarounds for Benjamin Badgersworth. I have knocked these up to act as a rough blocking guide for my final turnarounds. This image is 1 of the 4 characters I have to model for our project.
EXTRACT
"The image above shows the skeleton forms worked out from Sammy's original head sketches and my early proportion/skeleton tests. I have defined the joints as that is where distortion lies if it were not for these we would be blobs. I have a top arm separate for modelling the hand and the muscles of the arm. The side is where one notices the S curve from the central line. The chest sticks out leading into the pelvis Benjamin's body is like a bean which I know from the earlier form tests we conducted... He looks a little older then we had considered but this is just the earlier test."
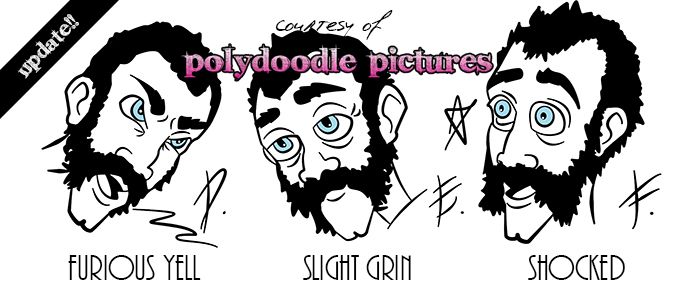
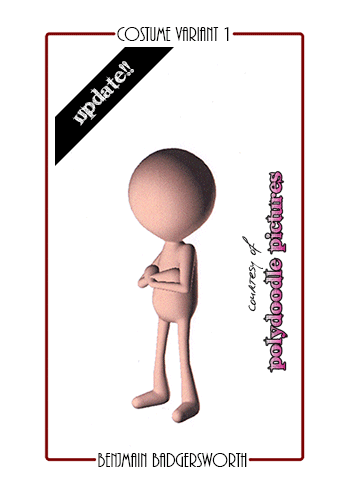
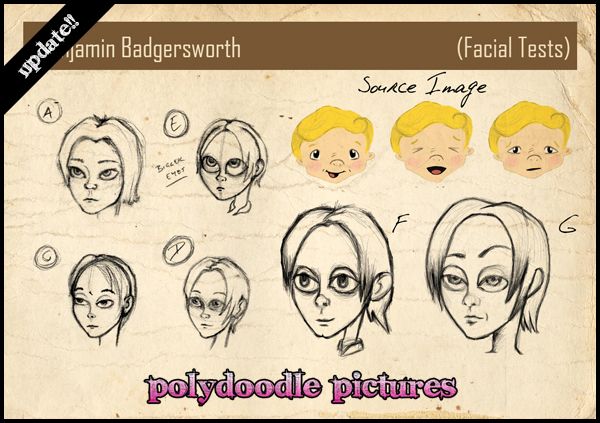
Here is a sample extract from my latest contribution (30/12/13) direct from Polydoodle Pictures Studio Blog. The image below shows a sample of my Bernard Expression sheets, these samples are D, E & F - (3 of a selected 12). This is actually the villain of our story and will be the last of our 4 final 3D character models.
EXTRACT
"I kept most of Bernard's expressions to the darker tones but I did break free from it which gave me time to explore some of his other facial activities. "Annoyed" and "Angry" were directly what Chrissie and Sammy saw so I indulged my "Thinking" expression. I actually think this one goes across all of the characters. After you do the basic emotions its hard to knock down more, I wanted to fulfil the 12 expression quota. Of course Alan and many like you will probably call me crazy and this is unnecessary but I liked to do it... If anything it made the others more explorative."
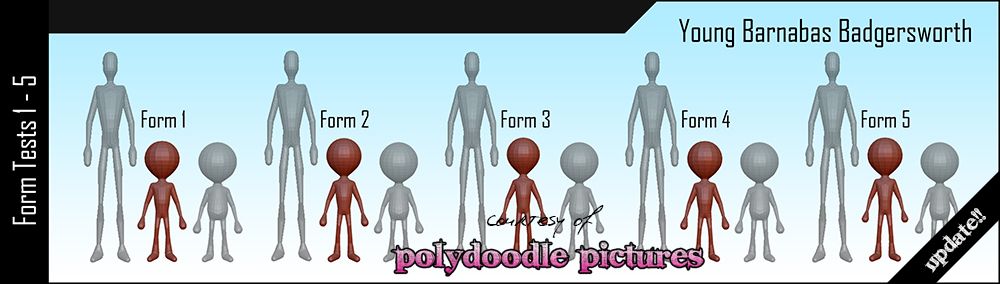
Here is a sample extract from my latest contribution (24/12/13) direct from Polydoodle Pictures Studio Blog. The video below shows my creative process for 2D expression sheets. The video concludes with a time lapse construction of the expressions for "Young Barnabas". The completed sheets are on the Polydoodle Blog.
EXTRACT
"The expressions above are where I started, I actually took a little time to align all of these models to be somewhat related to each other. Following Benjamin and Barnabas's expressions I didn't like how incorrect some of them are. It also bugged me how some of them didn't look necessarily like the same character. I corrected this for Young Barnabas but I probably should have spent more of this time on the main 2 characters expressions. Alas I cant use much more time on this 2D work, I have more models to make and we are graded on the CG aspect not pre-production."
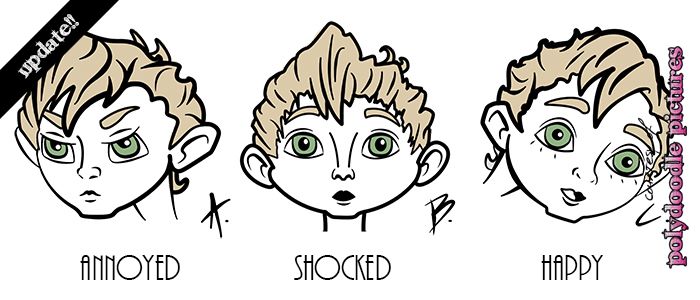
Here is a sample extract from my latest contribution (05/12/13) direct from Polydoodle Pictures Studio Blog. The image below shows a sample of my Benjamin Expression sheets, these samples are A, B & C - (3 of 12). This is actually the second of 4 character expression sheet posts. Please enjoy!
EXTRACT
"I started the first 3 expressions by doing what Justin told us not to do and what Sammy wanted me to do. I knocked up a facial expression which isn't ideal for the character (that being "Annoyed"). The kid is kind of a happy chappy so I did this mainly to appease me curiosity for "Angry Pooh Bears" (ask Sammy she will fill you in on what I mean there). I knocked up the "happy" expression trying to recreate what Sammy and Chrissie had originally decided on. Even though it went against my inner darker demon. The "shocked" face was directly from Sammy's front turnaround for reference."
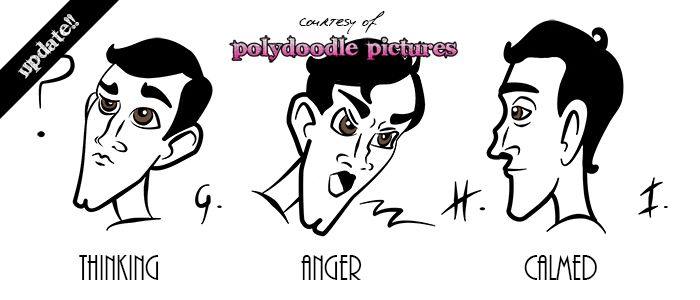
Here is a sample extract from my latest contribution (02/12/13) direct from Polydoodle Pictures Studio Blog. The image below shows a sample of my Barnabas Expression sheets, these samples are G, H & I - (3 of 12). This is actually the first of 4 character expression sheet posts. Please enjoy!
EXTRACT
"These are the first 3 expressions I knocked up, Chrissie and Sammy know about my fascination with all things sad (emo eyes anyone?). I never begin with "Happy" I do better with a kind of sadness. Of these 3 I love bored the most, there is something wrong with the shocked expression... I probably should have extended the nose a little more. It's like I said though I kind of have to move on from these pretty sharpish so I am posting up what I can now. This week is based on getting all of this pre-production stuff finalized on my end so I can get to modelling..."
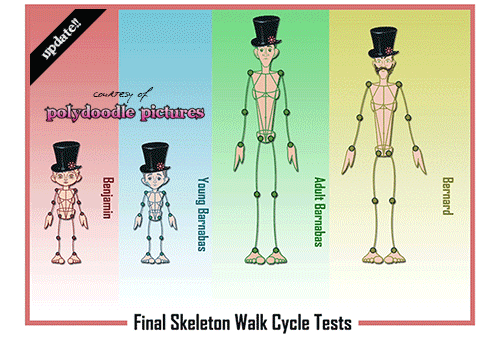
Here is a sample extract from my latest contribution (26/11/13) direct from Polydoodle Pictures Studio Blog. The image below shows the final frontal proportion skeletons. I animated these in After Effects after pre-compositing them making the joints and giving them control. The next step is just to add clothes and form!
EXTRACT
"The image above shows the skeletons in motion. As my previous skeleton tests this is just to show the skeletons in motion demonstrating activity within the proportion. I did this as an extra step, the walk cycles on there are the moment do not reflect the future movement of the character. I did this mainly so we could get a real idea of how the proportions function together. I cleaned up each skeleton with ink and colour using the colour pallet's Sammy suggested on her sketchy faces image. I added the hat as another indicator of scale - the same size hat fits all and even looks slightly bigger on the kids."
Here is a sample extract from my latest contribution (24/11/13) direct from Polydoodle Pictures Studio Blog. The video below shows our very first discussions for Sammy's Year 1 Unit 4 Project "& Son" which was filmed back in september (23/09/13). The discussion is by Story Director Sammy Butler, Art Director Chrissie Peters & Technical Director David John Vandepeer.
EXTRACT "The video above is the very first activity I recorded from the Uni. You will have to excuse my introduction which had me filming my legs before noting the work ha-ha. The initial conversations we were having were actually about art style and the characters primary and secondary. We had not actually been long out of the briefing when we sat to have that conversation as you can see the nerves were kind of high. The only videos that pre-date this one are the discussions we had over the summer break, which are being edited by Chrissie, cant wait to see them..." Check out the full article here >>
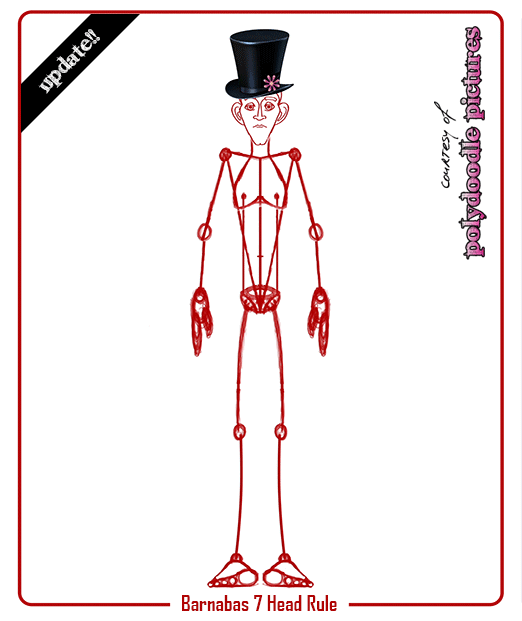
Here is a sample extract from my latest contribution (24/11/13) direct from Polydoodle Pictures Studio Blog. The image below shows a Barnabas doing a couple of minor movement exercises. This form is based on a 7 head Barnabas ruling which is the equivalent of 10.5 Benjamin heads.
EXTRACT
"The images above show a couple of the animated skeleton tests I conducted... This time I just had fun with the form which I ended up creating. There was such a huge amount of adjustment that I figured I'd just show the girls how this form looks when moving in various ways. The arms are a little longer now just to bring it closer to the reference but fundamentally that's the form I ended up relying on. I could not resist adding the hat here, it was essential to figuring out Barnabas to Benjamin's head space. You may have to click the images to see it in its glory, Barnabas is significantly taller then Benjamin."
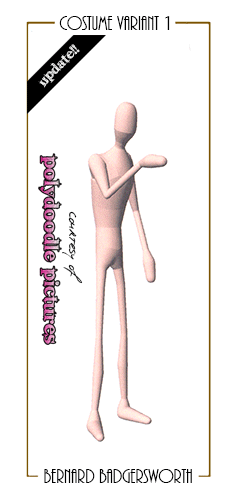
Here is a sample extract from my latest contribution (18/11/13) direct from Polydoodle Pictures Studio Blog. The image below shows 10 of my costume tests for "& Son's" character Bernard Badgersworth. These are a couple of alternate costume ideas.
EXTRACT
"The image above shows the little costume wardrobe animation that I have been accustomed to making for this Unit. The costumes are made from 4 variant costumes which are broken into parts and then reassembled to create different variants. I use this to create 10 additional variants from the primary 4. This allows me to explore the idea of what Bernard could be wearing and what colour combinations may or may not work. These costumes are all tested on a Bernard's early dummy form which was chosen by the Polydoodle Team to base him on at a structural level."
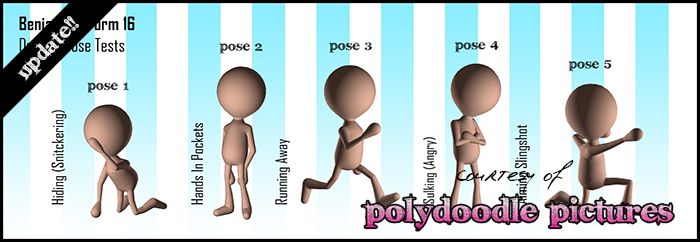
Here is a sample extract from my latest contribution (14/11/13) direct from Polydoodle Pictures Studio Blog. The image below shows a basic form walk cycle derived from a flat turnaround skeleton. The form is based on our earlier chosen 3D dummy - Form 16. This is an exploration post!
EXTRACT
"From my experiments I conducted a few basic movement tests using Benjamin's skeleton (images above). The image to the far left is based on the realistic proportions of a 5 year old with Benjamin's head. The image in the middle is an adaptation suggested by Sammy - that being shorter chest and longer legs. Last but not least the image to the far right is actually based from my dummy 3D pose tests. It was bugging me that we were not using the proportions of my form tests even though it appeared we were more or less adhering more towards them without our knowledge."
Here is a sample extract from my latest contribution (12/11/13) direct from Polydoodle Pictures Studio Blog.The video below shows our Interim for Polydoodle Pictures "& Son" which was filmed last Friday (08/11/13). Presented by team Polydoodle Chrissie Peters Samantha Butler and David John Vandepeer.
EXTRACT "The video above shows the entire 22 minute duration of our presentation to our CG Arts class. I was feeling a bit crap on the day so there were not many words from me. Our show runner Samantha Butler lead the presentation and myself and Chrissie Peters tried to jump in where we could. The presentation was largely about the Animatic just to see what peoples impressions were of the story at this stage. We didn't exactly get feedback from everyone in the class but Alan and Phil gave us some much needed input which will hopefully shape its outcome further." Check out the full article here >>
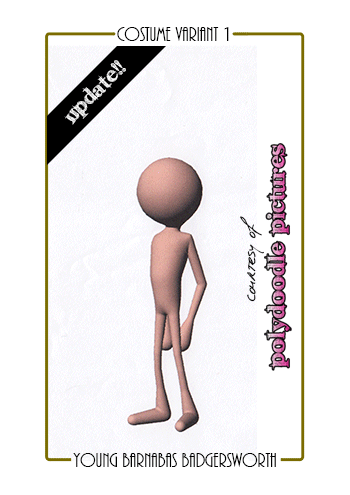
Here is a sample extract from my latest contribution (11/11/13) direct from Polydoodle Pictures Studio Blog. The image below shows 10 of my costume tests for "& Son's" character Young Barnabas Badgersworth. These are rough tests for costume ideas.
EXTRACT
"The image above shows the randomised costume variants available (which I kept limited to 10 once again). I could have sat down and picked out my favourite but I always think its better to post randomly here. After all the girls can always say to me I like that hat but I don't like that it has a paintbrush in it, etc. I also want to make my mark on the character, something which is solely my influence but I figured I'd get that opportunity in the modelling process. I just want to make sure that I have explored the earlier steps fully before going into 3D."
Here is a sample extract from my latest contribution (07/11/13) direct from Polydoodle Pictures Studio Blog. The image below shows 10 of my costume tests for "& Son's" character Barnabas Badgersworth. These will help finalize the clothing options!
EXTRACT
"The animation is made from 4 costume variants mixed and matched to make 10 alternative designs using interchangeable parts. The dummy itself was chosen in the earlier weeks from a massive selection of forms. All 3 of us came to agreement on how it looked but it has since changed a little from what it was. The final turnarounds will feature some of the characteristics of this dummy but may not be exact. The arms are a little too long and the back is arched a bit too far back. All of this is crude for the costume tests, refinement is the next step."
Here is a sample extract from my latest contribution (05/11/13) direct from Polydoodle Pictures Studio Blog. The image below shows 10 of my costume tests for "& Son's" character Benjamin Badgersworth. It's a mini wardrobe animation as I like to call it ha-ha.
EXTRACT
"I created this from 4 full costume variants, I interchanged certain elements of the image to get 10 alternate costumes from my initial 4 (e.g. mixing a hat with another costume or a different bow tie with shoes, etc). What I got was a variety of different styles which certainly cheered me up only having 4 colour variants (I wish there was time for more but I have to get cracking on the others). For now though I think this really gives a good selection and if anything is preferred we can address it at a later date... From what I know the suits are pretty much decided... I mainly wanted to play with size and colour..."
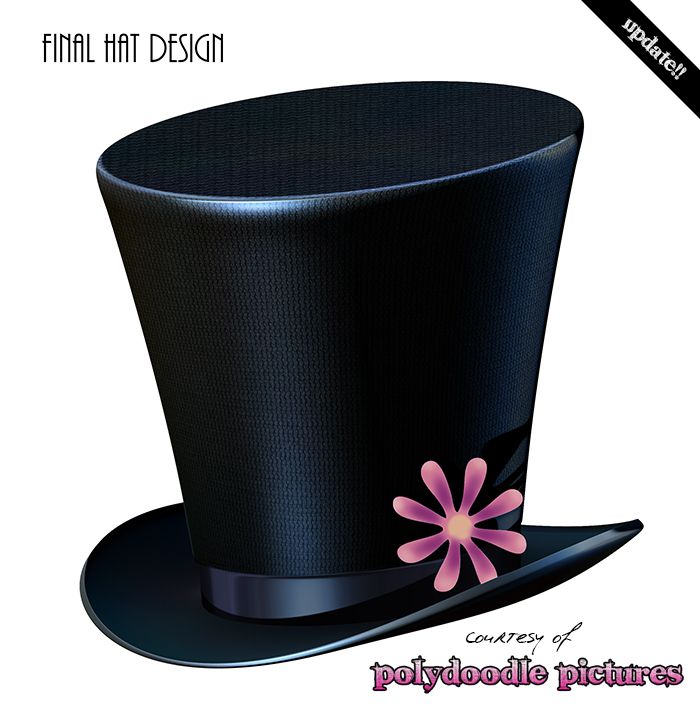
Here is a sample extract from my latest contribution (03/11/13) direct from Polydoodle Pictures Studio Blog. The image below shows the final rendition of a Composited hat design I made in ZBrush using render layers... In case you were curious the hat belongs to "Benjamin Badgersworth.
EXTRACT
"The image above is the final hat on its lonesome... This of course was tweaked and adjusted from a number of render layers allowing me to slightly tweak certain aspects including light colour and opacity, material, depth strength, colour raw/Photoshop & reflectivity. I could even use the FX controls to adjust hues of shadow and light or drop slight shadows behind the hat itself. The control by doing compositing (or Weta) is certainly astounding I love it. The hat design itself is slightly elongated. In case there was any question this is Benjamin's hat..."
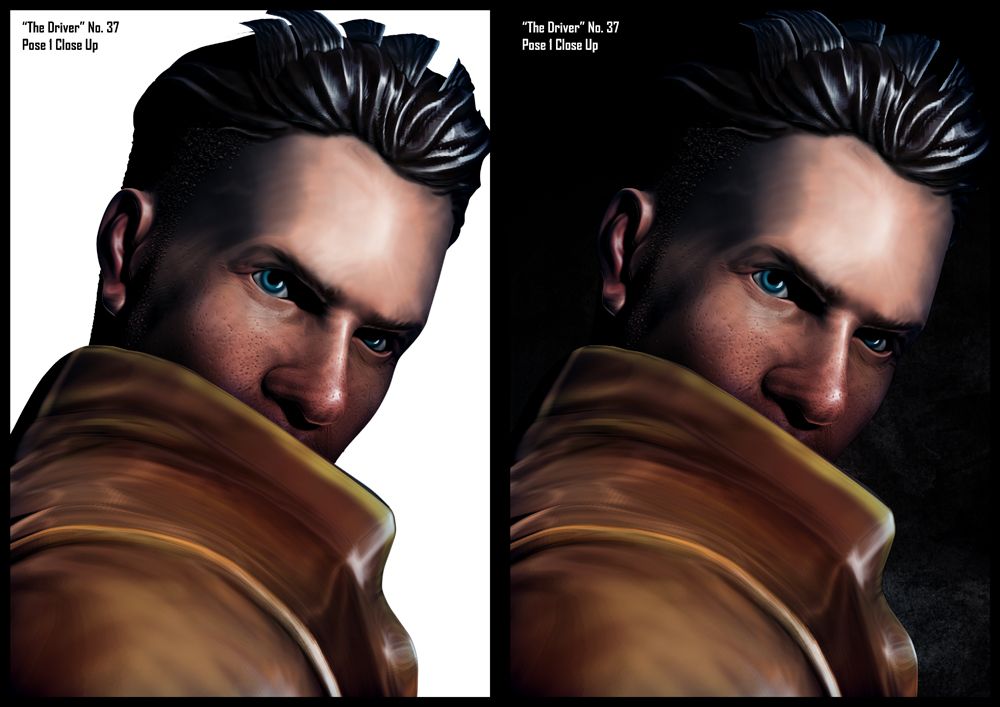
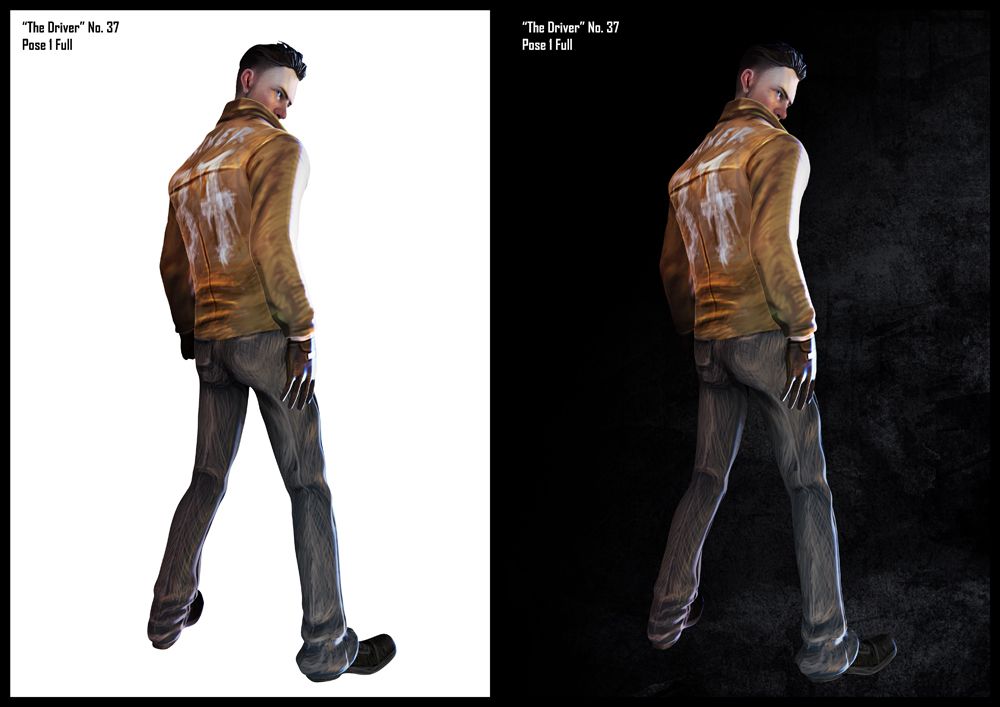
I have a few posts to get out of the way today with the first being based on work from my prior unit (Adaptation). Phil asked me to dig out a prior image from my Adaptation project from last term. Usually doing this task would not take long and would thus not require a post to commemorate it... Of course this is me we are talking about here. The image of my Driver Phil liked was from an level 3 concept I made, a concept which I rendered at a low level and thus all the composited passes. I tried up-scaling it but it just looked a bit blurry in areas.
So I set out to recreate the image and also try my hand once again at compositing Weta concepts using my high polygon Driver model. This meant I had to render out everything again and play with blending modes within Photoshop to achieve a desired result. I tried my best to recreate the image in an A4 template which slowed my ability to move about in ZBrush a little. Anyway I did manage to create some awesome outcomes, so good that I thought damn I should post those on my blog. Phil if you are reading this please let me know which you would like to have!
Anyway the images below were made entirely from Multi-pass Rendering in ZBrush which were then composited in Photoshop.
The image above shows a close up render which I built from render layers and a little bit of colour work in Photoshop. Phil said that the images maybe required on a white background but I preferred the black/textured when creating the design.Still I provided the alternative option in case black was a complete no go. I added the warmer reds in the face from Photoshop. I even added a slight inner blue shadow to illustrate the cool zones of the face. The jacket was completely pale so I had to warm that up. The eyes were the final correction... adding a slight glint.
After completing the first image I thought as I have the pose here why not try my hand at multi-passing this too. Contrary to everything this is my favourite pose for Driver. It has that come and get some kind of look. Anyway the warmer colours particularly the blues and reds were added why splotches of paint and the colour dodge blending mode. I remember adding subtle blues and reds to Driver when I was doing the last concept... It was my way of simulating the flashing lights of a cop car, guess I forgot that this was set in the 1930s.
Last but not least is the pose Phil said he wanted, as I said probably the only thing that is different is the lighting here. The key light gives the form its depth which is why you are not seeing a great amount of light rays. What also doesn't help here is the angle. Phil if this is not okay please let me know. I am still coming to terms with the lighting options within ZBrush but as this is like my 4th attempt at multi pass rendering from ZBrush I think I'm doing okay. Anyway yeah I could not resist but to get my hands dirty if I was going back into this character for one last outing.
I thought I would put this up not just so Phil can decide which (if any) of these he prefers. Mainly though I thought this would be another opportunity to look into compositing and Weta Design. I really am loving it for character design. It will defiantly help in the future with other conceptual pieces. I will even try to do it for "& Son" if possible. It's actually quite fun once you start playing with the individual layers of an image. You can tweak the shadows, the light, the colours, the borders, the depth, it completely unpacks the image for easy use... Everyone should try it!
Phil let me know if there's any of these you'd like Ill send you over the A4 PSD's!
Anyway that's it for this post, its been emotional... Back to our regularly scheduled programming.
Here is a sample extract from my latest contribution (31/10/13) direct from Polydoodle Pictures Studio Blog. The video below shows Sammy Butler creating the first draft of our animated short "& Son". Check out the full post on our studio blog!
EXTRACT "The video above shows a bit of the editing Process with Polydoodle Pictures Sammy Butler. She is working in premiere putting all of those stills in one by one. The next stage in the process is drawing over them but we will get there. I thought I would just go over it a bit before revealing Sammy's already released initial draft. I think it is Act 1 just leading on to Act 2 right before the second prank from Benjamin. In this case though I have to say we have avoided the "little shit" territory we previously found ourselves at with his character." Check out the full article here >>
Here is a sample extract from my latest contribution (25/10/13) direct from Polydoodle Pictures Studio Blog. The video below shows Sammy Butler walking us through the draft storyboards for "& Son". Check out the full post on our studio blog!
EXTRACT "The video above is based entirely on our first draft storyboards. I wanted this mainly so when we are sitting around at Week 15 wiping the sweat from our brow we can look back at this for some nostalgia. It is not only to show how far we have come but also to somewhat explain the storyboarding process for people who have yet to come to grips with its benefits. I do let my introduction trail off throughout the video just to let Sammy explain a couple of details in the short, things you will see come Q2 2014 next year should they make the final edit." Check out the full article here >>
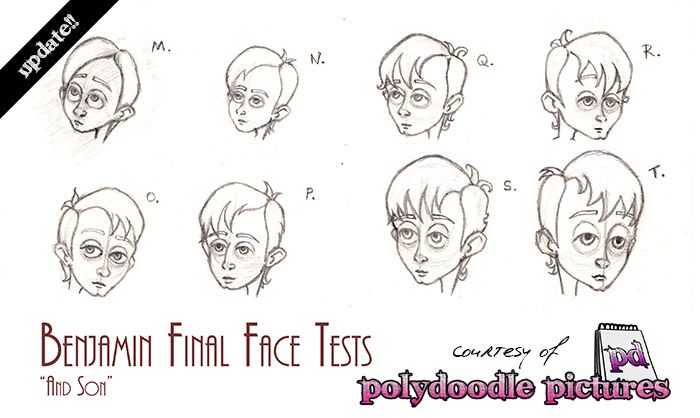
Here is a sample extract from my latest contribution (24/10/13) direct from Polydoodle Pictures Studio Blog. The image below shows a sample of my final head tests for all main characters, this one in particular is Benjamin Badgersworth.
EXTRACT
"The image above shows the head tests I conducted for Benjamin. These basically continue from M and are a little jumbled but I figured as long as the letter is there it doesn't matter. The girls gave no opinions on these but I quite liked Q. S was a very close second mainly because I loved the curly locks. I wasn't sure if these curls were something we were showing on Benjamin before or after his Fathers adjusted personality but never the less I couldn't resist trying out lots of things with his hair. I also tried a few slight feature adaptations, I kept making the eyes progressively bigger with the forehead for example!"
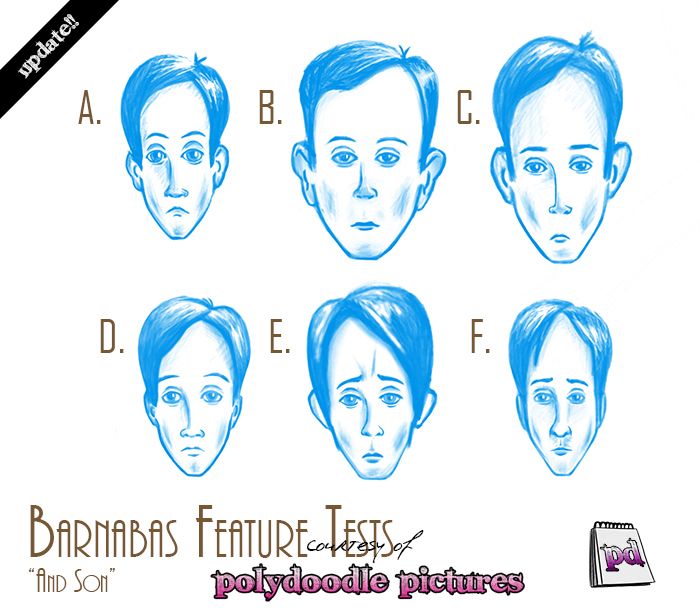
Here is a sample extract from my latest contribution (18/10/13) direct from Polydoodle Pictures Studio Blog. The image below shows feature tests I conducted to explore Barnabas's possible facial characteristics.
EXTRACT
"The image above shows 6 facial tests that I conducted on the IPAD. I just wanted to play with features here, I wanted to see what would happen if I made the head bigger, made the eyes smaller. Shrank the head, strengthened the chin, weakened the chin, etc, etc. I didn't want to give up with just some basic ideas. I didn't start trying to change the nose significantly because I kind of liked the thinner nose... Still I explored the alternate in the next row of sketches and found something I liked even more... If I'm honest I liked E but that would only work as a child... Note the size of the head and eyes!"
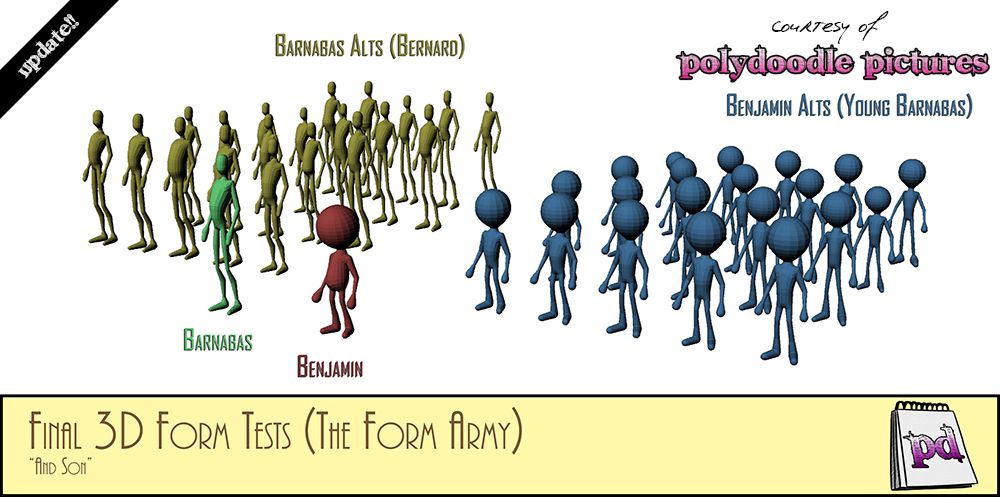
Here is a sample extract from my latest contribution (18/10/13) direct from Polydoodle Pictures Studio Blog. The image below shows the form Army, which lead to our final form choices for Bernard, Benjamin, Barnabas & Young Barnabas.
EXTRACT
"We started out with what I like to call the Form Army... There were 20 variants of Benjamin's final form and 20 variants of Barnabas's final form. This not only allowed them to choose Bernard and Young Barnabas's forms but it also allowed Chrissie and Sammy the option of changing our chosen forms for Barnabas and Benjamin with one of the others. I wasn't against anything here as I knew the forms were sound just slightly deviated from each other... I didn't rock the boat too much on these alternates just to keep the form and character feel intact."
Here is a sample extract from my latest contribution (14/10/13) direct from Polydoodle Pictures Studio Blog. The image below shows some rough sketches for one of & Son's chief characters "Benjamin Badgersworth".
EXTRACT
"The image above shows Figures A - H which is actually the opposite order of when they were created. F, G & H were actually the first and were done very roughly and quickly before I had even met to discuss art with my creative partners. I drew these just to get the idea of drawing younger kids. Dennis the Menace was the inspiration I also did these based on the notion that Benjamin was a teen, this has since been changed... I knocked up A from looking at the Z Sphere form posed (its actually based on Pose 2 of Benjamin's pose test post here.) I based the heads (B-D) on the head of A. "
Here is a sample extract from my latest contribution (13/10/13) direct from Polydoodle Pictures Studio Blog. The image below shows Bernard Badgersworth's 3D form variants figures 1 - 5 (out of 20)
EXTRACT
"The image above shows Bernard's forms 1 - 5. In the early stages as per usual the top forms are usually very close to the original design. I tend to start not adventuring too far in the beginning. I later load up other ZBrush forms previously created and adapt them slightly to create a moving design. This is usually why the later designs get interesting. Of these ones Form 4 is probably my favourite, I like the podgy belly and the fact that the father is leering below Barnabas a bit... The frame is near identical but the flabby belly could be attributed to Benjamin..."
Here is a sample extract from my latest contribution (13/10/13) direct from Polydoodle Pictures Studio Blog. The image below shows Young Barnabas Badgersworth's 3D form variants figures 1 - 5 (out of 20)
EXTRACT
"The image above shows forms 1 - 5. Form 1 is probably the closest to the original Benjamin model. I just made sure I gave him a thinner waste so you could see the form translate to his adult form. Forms 2 - 4 were fundamentally made by increasing the length of his legs and trying to thin those down. I also tried adapting his physique a little more to cross over to the adult. Form 5 was a bit of a change as I started shrinking his arms and broadening his head back out. Part of me thinks Form 4 was the most successful for combining the two characters."
Here is a sample extract from my latest contribution (06/10/13) direct from Polydoodle Pictures Studio Blog. The video below shows the art of Wood Burning for our Polydoodle Chest. Check out the full post on our studio blog!
EXTRACT The video above shows the very first "Doodler" video of my business partner Ross Castle May burning the "Polydoodle" logo into a box that I purchased from Amazon. Over the course of about 2 hours the box was complete. The video is speeded up in certain portions because I figured people would just want to see the action not so much at its normal pace. I even knocked up the animated logo for the doodler which I had quite a bit of fun making yesterday ha-ha. I wasn't even going to make this video but after sorting out the logo I thought "what the hell... Check out the full article here >>
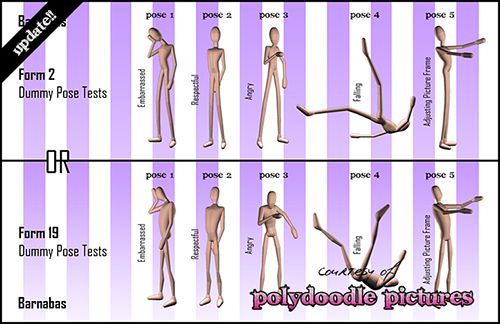
Here is a sample extract from my latest contribution (05/10/13) direct from Polydoodle Pictures Studio Blog. The image below shows Barnabas Badgersworth's Dummy form poses based on reference starring.... ME!
EXTRACT
"The image above shows two forms which we were stuck at a crossroads with for Barnabas's form at a base level. From a front perspective the proportions merely look to be the only obstacle (check out Barnabas's base form post here). In truth at this point I was outnumbered 2 - 1 by Chrissie and Sammy on the base form for Barnabas being Form 2. It wasn't until I showed them how form 19 and 2 looked while posed that got them to reconsider Barnabas's base form. I don't like to toot my own horn but this just goes to show that posing these primitive forms helped us agree on the basic anatomical proportions of Barnabas. You can sketch it, but I modelled it, roughly."
Here is a sample extract from my latest contribution (04/10/13) direct from Polydoodle Pictures Studio Blog. The image below shows Benjamin Badgersworth's Dummy form poses based on reference starring.... ME!
EXTRACT
"The image above shows the base form we chose back on the previous form post but in a couple of elaborate poses. The
beautiful thing about building models using ZSpheres is at this base
level you can move spheres around like armatures and create basic
movement and stances. The poses above were created just by rotating joints around spherical pivots (ZSpheres). You assign the spherical pivots by drawing them onto a base ZSphere. From there you pull out arms, legs, a neck, head. This model is quite basic but I didnt want to get into it too much... not yet."
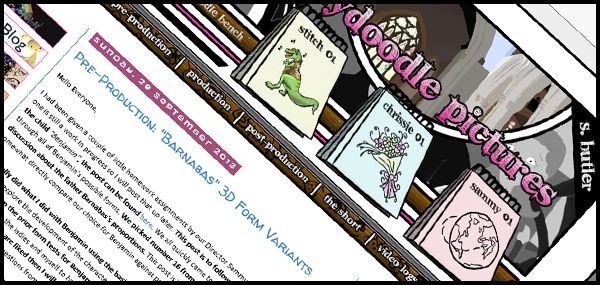
Here is a sample extract from my latest contribution (29/09/13) direct from Polydoodle Pictures Studio Blog. The image below shows Barnabas Badgersworth's 3D form variants figures 1 - 5 (out of 20)
EXTRACT
"Form tests 1 - 5 (shown above) were based primarily on Sammy's original design for Barnabas click here to see the original art of . It was Sammy's original design which suggested long legs which were smaller as they came into the body. As we got to Form 5 I started to spread his pelvis a little more to contrast it with the broader shoulders. I was trying to keep him masculine by keeping the pelvis smaller then the torso. Of course I underestimated the shoulders... Still Form 5 here is probably my favourite from this set of forms."
Here is a sample extract from my latest contribution (26/09/13) direct from Polydoodle Pictures Studio Blog. The image below shows Benjamin Badgersworth's 3D form variants figures 1 - 5 (out of 20)
EXTRACT
"Form 1 was created from an original draft sketch I knocked up on my IPAD. Form 2 was created by lowering the shoulders quite a lot I wanted to keep the proportions of the body and waist similar. Looks a bit feminine now that I think of it. Figure 3 was built from shortening the legs further and increasing the size of the head. From this point I just added weight to the body for Form 4 and a bit of muscle. Form 5 was my attempt at making his hands huge, feet wider and head much much bigger. This was kind of Pixar inspired."
Here is a sample extract from my latest contribution (26/09/13) direct from Polydoodle Pictures Studio Blog. The image below shows a ZDummy model. This rough model can be adapted into any base form.
EXTRACT
"I have a turn around render of "Form Test 1" which basically just shows the dummy at its current state. I would just like to say at this point that all of these features are easily modified. From the theory above we can easily make the head bigger the arms shorter, the hands smaller, the calves thinner... all at a base level to easily find the right anatomical form for Benjamin. This can then be adapted into another form to find one of the other characters. Once a form has been decided sketches and other accompanying poses could be explored..."
Here is a sample extract from my latest contribution (26/09/13) direct from Polydoodle Pictures Studio Blog. The image below shows a couple of initial face tests I knocked up for "Benjamin".
EXTRACT
"I referenced Sammy's original design for Benjamin mainly so people can really see what we mean by "Little Shit". I did a few sketches from A - C when I hit D I found something I thought was okay. Decided to try to refine it a little further with E, F and G. This was just a couple of little expression tests really. G was heavily inspired from the face Calkin is pulling in the influence map above. These were just a couple of little tests to get my juices flowing really."
Here is a sample extract from my latest contribution (21/09/13) direct from Polydoodle Pictures Studio Blog. The image below shows a couple of the dedicated pages on the Polydoodle Pictures blog.
EXTRACT
"The first topic to discuss will be the features of this little blog. This is not only for the public to digest but it is also for my creative partners in crime Sammy & Chrissie. Now I wont waffle but all of the buttons in the top bar now lead to actual links *SHOCK HORROR* (some to pages and some to labels). First and foremost I will talk about the custom made pages on this blog (shown in the image below)."
Another minor update but I'm dealing with a bit of a backlog here and I still have to do a post or two on the 365 Day Project website yet. Never the less I will maintain my obligations to every blog and website, there just may be a few hours between updates. Anyway for those of you that do not know or have not read the prior post... For my minor project I am working in collaboration with Chrissie Peters and Sammy Butler on our studio blog "Polydoodle Pictures" which can be located here: http://polydoodlepictures.blogspot.co.uk/.
The Goal of our Minor Project(Polydoodles minor project)is to create Pre-Production assets(concept art, 3D models, animatic, pre-viz, etc.)to develop Sammy's prior unit 4: storytelling unit which was entitled"& Son". Information about it can be found on Sammy's blog here: http://sammybutler.blogspot.co.uk/search/label/Unit%204. The assets created by our minor project(3D character models, 3D scenes, etc.)will then be used in the creation of a final animated short. This is a year long collaboration between our team of 3 over at Polydoodle.
Anyway lets continue with this little update!
The image above is how I will post little samples from my posts over at the Polydoodle pictures blog. I will post one image on this blog an image like the one above with a bit of information about the post. I will tag and name the post and at the bottom provide a link to the full post over on the Polydoodle Pictures blog. I don't see the point of typing up the same post again on this blog when it is already posted over at Polydoodle. This way I can inform everyone that I have posted just on a different blog while giving them a little information on the post before they visit the link.
The Polydoodle Pictures Studio blog (shown above)will have 3 lots of updates coming in from Art Director Chrissie Peters Story Director Sammy Butler and Technical Director yours truly David Vandepeer(Stitch). The minor and major project is to make up what has come to be known as the year long project as it takes a sizeable amount of time to complete certain animated shorts. Updates will be regular so please follow the blog if you are not already. I will only be publishing my contributions to the project on my blog so check theirs out as well!
To find Sammy's blog go to this address:http://sammybutler.blogspot.co.uk/. To find Chrissies blog go to this address: http://small-brown-dog.blogspot.co.uk/. You know where I am if you are reading this post so no need to tell you my blog. The Polydoodle Pictures blog is also at the top of this post, just in case you missed it. Hopefully by the end of this project we will have something epic to be talked about for years to come. It's my third year after all, I really want to push the boat out and knock as many people flat as possible... Keep your eyes peeled for updates!!
I have a few updates to do on this blog mainly due to my attention being divided between a secondary blog and my 365 Day Project website. I am going through the backlog now and am hoping to file a few things away on here tonight. Firstly I will talk to you briefly about my own personal third year University project (The 365 Day Project) which will be comprised mostly of Video logs and photograph documentation. The 365 Day Project is to mark the third and final year of my undergraduate degree at the University of the Creative Arts Rochester.
Throughout this year I will be sporting a camera and interviewing a few of my creative colleagues about their respective projects. I will also be documenting my exploits with our third year collaboration group "Polydoodle Pictures". I will post headlines from these here and link the post on here to our group blog over at www.polydoodlepictures.blogspot.co.uk. Other topics covered by the Project include"Angry Bear", "The Creative Step Guide", "Exclusive Leap" & "Operation Z". You can read about these more at the website www.365dp.co.uk, please check it out!
The image above shows the overall logo for the project(usually it animates). The website is basically built to document my creative exploits for my final year in the CG Arts and Animation Course. I have a minor and major project as well as a dissertation to refine. The Minor and Major will be based over at the Polydoodle Blog but I will post headlines here and videos on the 365 Day Project site. If you are just looking for polydoodle updates specifically then you can just go and check out the blog at the link above. As buzz light year used to say "to infinity and beyond!"
The video above shows a brief introduction to the project. If you would like to see more details about the project please just go directly to the website. I will not be posting too many updates onto this blog directly from the project site(I don't see a point of posting this project everywhere I'm already doing it for polydoodle). It will be up to everyone if they would like to see their respective interviews, etc by visiting the proper website. Time is really short and I'd like to try and keep my post amount down but there will be lots of updates you just have to go to the right places.
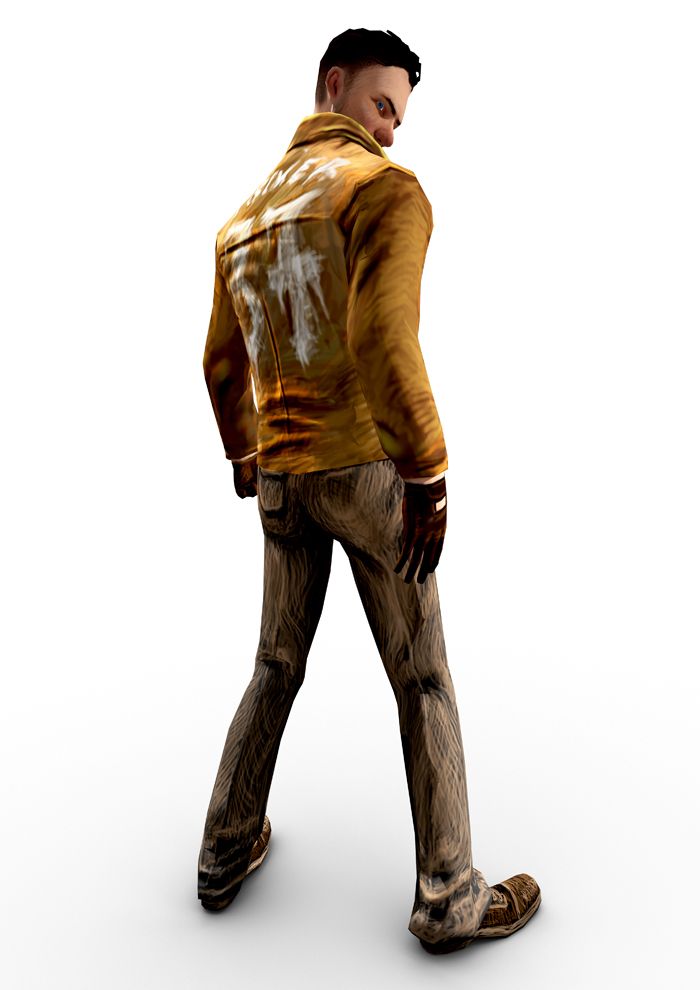
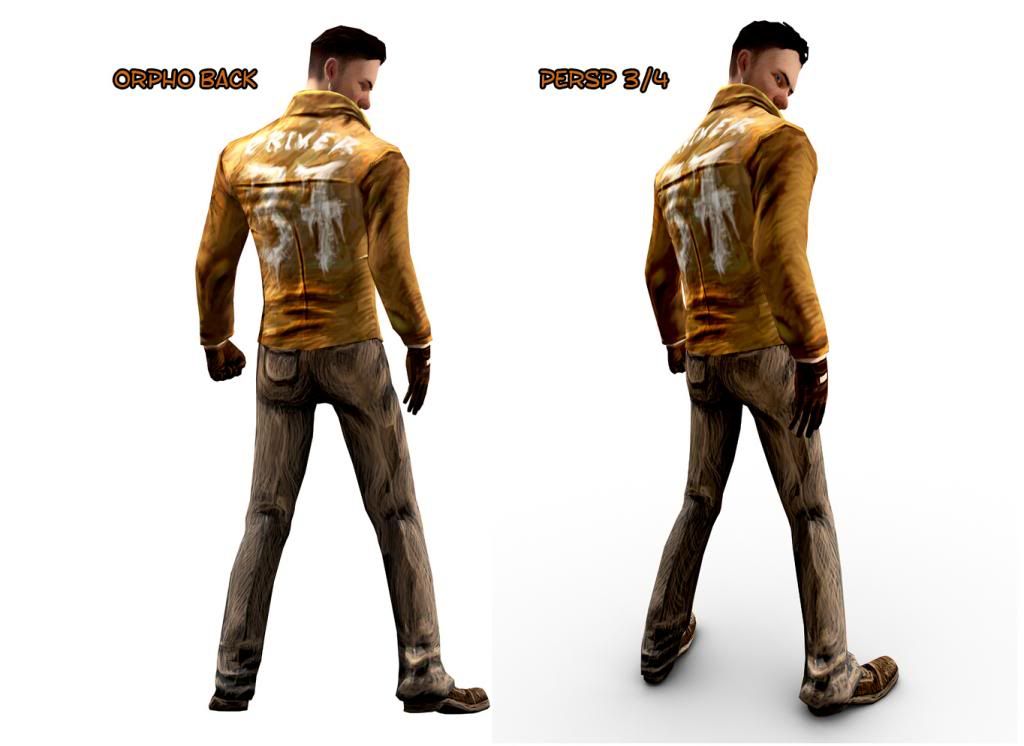
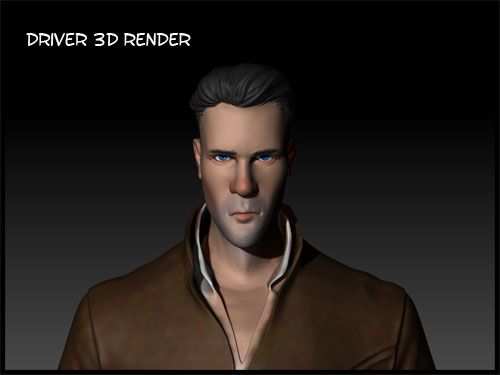
I bet by now everyone thought I would be gone in the wind but alas I am still here providing a little update. I was asked to submit a decent high res image of my Driver to Phil and well I wanted something a little more dynamic this time round. So today I set myself the task of posing the Driver once again this time in a much more difficult way. I made it my mission to make his body curve with an arm something that was not easy. I'm still not sure its 100% correct now but I am quite happy with the image I got at the end of the fireworks.
I decided the high res image I was asked to get warranted a post it note and you know how I get once something is on a post it note. I committed a portion of the day getting it right in most of the areas but It didn't just begin with a pose idea. I had to research the pose and then recreate the pose in a 3D medium... Something I haven't used much before - Daz Studios... a free piece of kit that allows you a fully rigged male/female character to pose and adjust. Once I knocked out some decent renders the proceedings moved into ZBrush for the transposing and general moving of low poly vertices...
Let me break down my journey for the following pose...
The image above shows the final pose I created with a little research and quite a bit of test rendering. I was torn between wanting to show his face and wanting to show the iconic"Driver 37"Jacket so I found myself trying to sit in-between the two. It created the image above of course scaling was also an issue... I have never rendered out an A3 image from Maya so it was trial and error. Plus the image size goes out of the viewports range so you cannot see how far out you are until you render. (Alan if there's an easier way let me know). Regardless we got there in the end, Driver on an occlusion canvas. It just makes it feel as though he is on the ground and not floating...
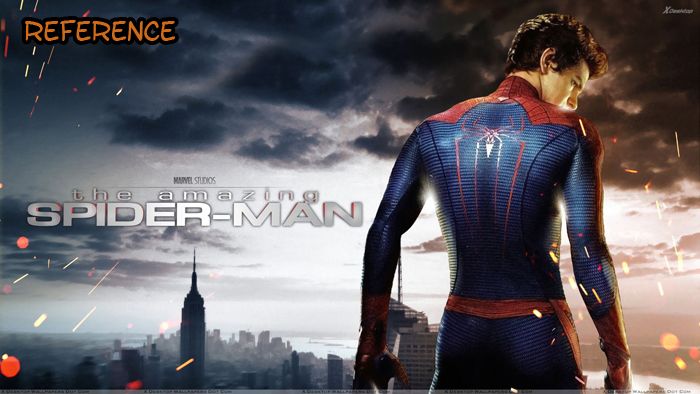
The image above shows the reference imagery I used to create my pose ironically it is probably the only thing I like about the new Spiderman... Cool pose. The only problem I found with the image was it cut his legs out so I kind of have to assume how they would go. This warranted some further development in a program I was otherwise unfamiliar with until today really... Of course what I hadn't banked on was a few little hiccups within Daz... The controls can be weird if you don't know what you are looking for... Either that or I had a weird day... could be either...
These were a couple of development steps I made in trying to recreate the full spider-man pose in Daz. They are in order so I began with A and ended on C but I liked the idea of one hand being open and the other balled into a fist. Before you say it and I know someone out there will at least think it I did not choose to make him naked. I am not a pervert, so just calm down and enjoy the rest of the post. Basically I needed to appreciate the anatomy in order to attempt the pose on Driver. It's also because I have yet to figure out how to operate clothes in Daz... lets move on...
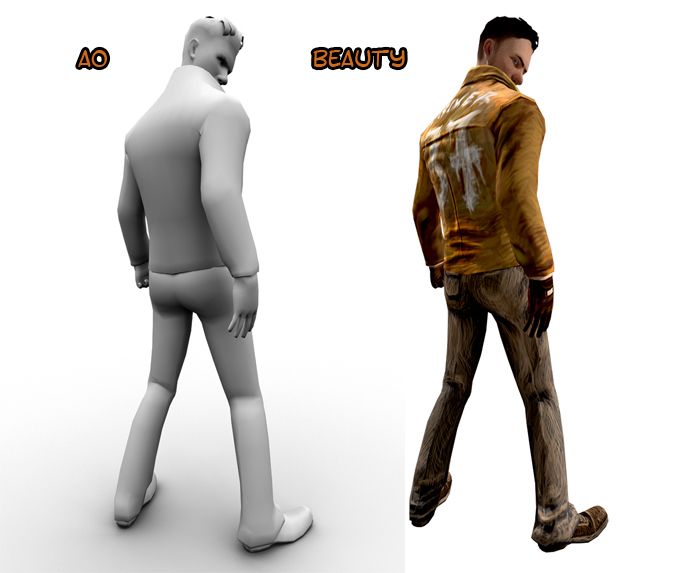
Next is a bit of render pass action (you knew I was going to do it). I figured I only really wanted 2. It does me no use to create a million passes for what I want to keep low and cool looking. I wound up not using the AO map on the Driver but merely using the Driver on the AO map... In other words the AO map doesn't affect the texturing of the render at all. I put the Beauty over the top without a blending mode. The only thing I wanted the AO for was to give him some ground which I was forced to keep in another wise white environment...What can I say I couldn't resist - he needed grounding.
Next are just the final results again. I am quite fond of the Orthographic back mainly because again it grounds him pretty well. Either way I think I will send Phil both of these I just can't decide but the 3/4 pose is certainly dynamic so maybe that. I also love the little amount of AO shadow under his feet, really does give some depth to the floor. It will be quite nice to look at this and know its low poly and I hardly did anything to it for it to look cool other then render it in Maya with mental ray. I can remember having a discussion with Alan about getting decent renders from Maya I guess I've been a noob...
I had started making videos of this process but in this instance I didn't really see a point, there is quite a bit of admin in placing videos. I guess at the end of the day I felt the post with images was enough without having to see a couple of ins and outs. I am hoping that this pose is liked I did screw around quite a bit to get this pose to work and look dynamic. I kind of like that his face is hidden it really does feel like a pose he would pull. That's what was rubbish about the poses I made in the past for this guy... They looked okay but they just wasn't him... I like this pose... It feels like a pose the Driver would pull...
Anyway, Ill be sending these over in a bit Phil :) xXStItChXx
I have been putting off this post, I guess because my mind is still a little glued to this project but the show must go on. For this project I set out to prove...something maybe that I still had a little magic hidden in the joints of my bones. I have done 45 posts for this Unit and racked up an insane image count on photo-bucket (204 images - my personal best). My video count on YouTube has gone up 50 videos some fair play are Maya tutorials but you only really have to deduct 20 for that meaning I created 30 videos for the"Short Drive"project alone...
This is probably my largest submission to date and boy did I feel it ha-ha. I guess this Unit absorbed me a little more - kept me in check but now is my opportunity to kick back and relax a little. I still have a number of things going on over the summer - one being fixing my dissertation stuff as my grade from the proposal didn't satisfy me. I also have a couple of projects with my little games company so hopefully we will get something nice knocked up for those. I even have a little experience at a games company in London... looking forward to that :)
Anyway, I give you the end of Unit 9: Adaptation...
It has been a long 12 or so weeks since this project began, I got started a little late due to some personal concerns but I clawed my way back. The timeline was briefly extended on the board when I found that we had been given an extension beyond the original deadline day. Its actually kind of lucky that happened I'm not sure I would have had everything done in time otherwise. It's still kind of hard to believe that I am now over the half way point of my degree. It only feels like yesterday when I was hitting my head against a wall trying to do 750 drawings for my "Oafish Lamp".
For the most part I got everything done, I am still a little gutted that I didn't achieve the Maya Tutorials for a second term. I used to be so organised with them I guess I just keep getting carried away with the projects. Never mind though I will do the ones I missed over the course of summer and post them up on here. Before then though I will be taking a bit of personal time, I would like to see my dads plaque at some point which is at a golf course. I am going to have to play a game (I suck at golf)but I'll do it to salute my old man on the anniversary of his death...
Do not worry though I will be back before you know it hopefully with some more cool developments on various creative exploits. I even have a particular project in mind for the final year of our degree but I have yet to finalize it. When I have more to share on it I will give everyone a heads up but for now wait patiently (that's if you care ha-ha). I still have to send some high definition renders of my Driver to Phil at University for displaying him in all his glory. Don't worry Phil I haven't forgotten I just had to get these other bits out of the way...
Task - Creating Low Poly Games Characters/Vehicles
Setting - 1930s Chicago (The Great Depression)
Game Synopsis -
The drive was short but sweet, almost ideal. Deep down he wanted it to last a little longer as he had many times before. But this time it felt... different, adrenaline had slowed everything to a crawl. Driver knew why but he didn’t care. This was how it was supposed to be. Sitting back, a grin slid across his face as he anchored his foot to the floor. His unwelcomed passenger was less happy as he shot the Pontiac across the populated crossroads. For a moment he thought he’d lost this game of roulette. Then... “Smash”... he won.
A Short Drive Between Two Lives Full Demo Reel
Final Result -
3951 Low Poly Driver Model 3906 Low Poly "Night" Car Model 3226 Low Poly "Day Car Model
Final Thoughts -
It was nice to get in the mind set for what may be a future career. This Unit has helped me understand the creative methodology to achieving a high standard low poly model. It was also nice to get a chance to exercise my dark desires by the source materials noir undertones. All in all I enjoyed it and probably got a little too into it, to the point I couldn't turn it off... Here's to the next project!
Consecutive post number 2 reporting for duty, I just want to get things finalised today and I can think of no better way then sitting down and just cracking them out. These posts are my final touches to an otherwise successful completion of Unit 9 - Adaptation. These things are just extras as they are after the deadline and are more for my own piece of mind. I would think of myself as a heathen if I didn't share them with the world as I have become so accustom to doing. I would have knocked these up sooner but I have been doing a bit of tinkering around the house... It was sorely needed.
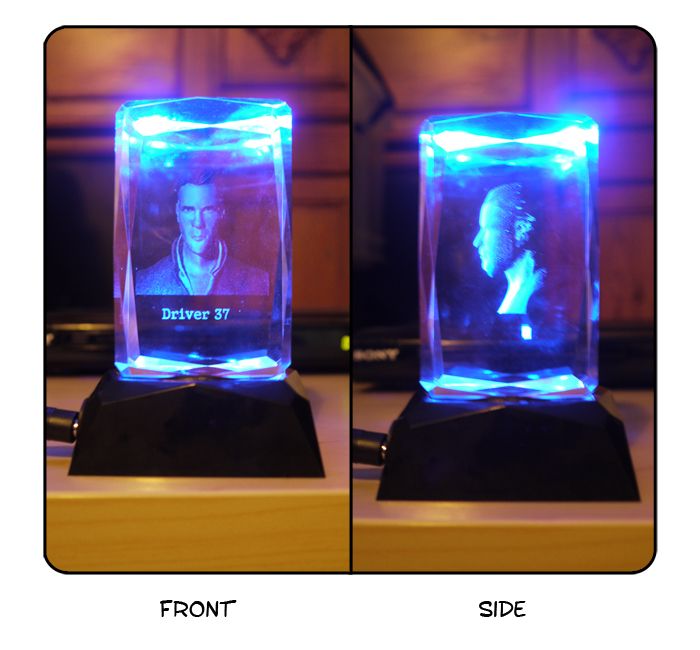
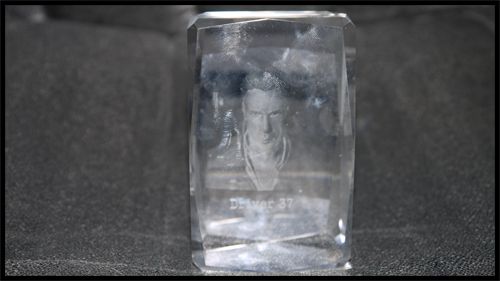
This post is about 3D Crystals one of my little "extras" which turns 2D images into crystallised 3D manifestations. Basically you send a photograph to a firm and they etch the pixels of the image into crystal creating a un-degradable photograph. The image is also given dimension but it is not a complete 3D representation as the back is transparent. If anything it creates a kind of mask for the photograph meaning the back just shows the inside of the front of the face which essentially is the front of the face. Its cool and I got a light with this particular order :)
Anyway lets get down to the 3D Crystal!!
The image above is the front and side views of my 3D Crystal. From the front it looks like an image but you can turn it and it does provide dimension largely due to the side/depth. Of course the side is kind of an illusion because it can only go back so far before the image has to end. I had half a mind to enquire about sending 3D files to these companies but I'm not sure if they have the facilities to print full 3D geometry into Crystal. It's probably something I could ask in the future. I guess this time I just wanted to mix it up a bit and try something different from a marketing stand point...
The render above is the actual image that I sent the firm when ordering the Crystal. At this stage I hadn't finished the painting aspects but just wanted to order a 3D Crystal to see if it could work. I was pushed for time and wanted to send them something, I was hoping it would be here before Crit but deep down I knew it wouldn't be. Part of me wishes that I had ordered 3 Crystals each with different coloured lights to show the colour code of my 3 3D games models. Again this is something I could still go away and do but 3D Crystals are about £45.00 just for one... Quite pricey...
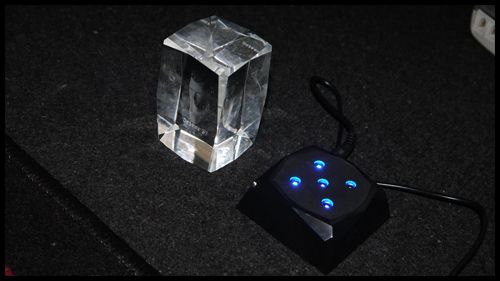
The image above shows the Crystal without any light other then my cameras flash. I probably should have cleaned it before taking this picture as you can see all of my finger prints. For those of you that do not know I always feel a need to try and take something physical from my projects. I like to be able to interact with what I create. Making something digital is one thing but physically holding something you created in your hands is another entirely. I will always strive to push this further and further... I have done it with viral books, rapid prototyping, t shirts and now 3D Crystals... I wonder what's next...
The image above shows what I received in the mail when ordering my Drivers 2D/3D bust. You basically get a little light stand that projects the light up into the Crystal. This illuminates the pixel etchings inside. You can get a better idea of this just by looking at the image at the start of this post. Its actually quite cool because you can see them in the dark and they are quite good night lights I don't mind saying. There is also the option for battery power should you need them to be portable which I imagine is a cool thing for displaying to clients or networking events even.
Its actually quite a cool things to own should you have the option to one day purchase one. I had the epiphany some time back when I went to Florida. They basically turned my ugly mug into a 3D Crystal and I really liked the idea wanting to go beyond the digital realm and more into physical creations. You can add custom text to the Crystal also should you have the need to lay out a message or in my case an illustration of his identity "Driver 37". All in all its another avenue for me to push my creative exploits in the near future... Very cool for a 2D image.
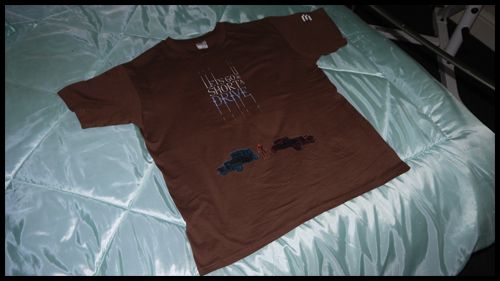
I am winding down to the last few posts for this Unit now (mainly because it ended the other week). Still I have taken the time to go back and correct a few things(creating a final demo reel also). I also have a couple of things that I ordered for the day of the Crit which meant they would not get posted up until after. My T-Shirt I wore on the day and my 3D Crystal didn't arrive until after the Crit which meant I couldn't show it on the day. Never the less I am here now with this little back log so I will post these up and then get back to mowing lawns outside(I have a large one to finish today).
The T-Shirt Design like all of my T-Shirts has always been a developmental step towards a completed project. They never sport the final renders or concepts but utilize some of the conceptual development. In this case of this one it shows my completed 3D assets but sadly without the wire as the poly-painting was not yet complete when I had to make the order. Every T-Shirt, Item, etc. has to be ordered a week or so before Crit to ensure it arrives in time. In this case I was lucky that my T-Shirt arrived the day prior to the Crit... I love cutting things close.
Anyway lets get to the details of the - "Short Drive"T-Shirt!!
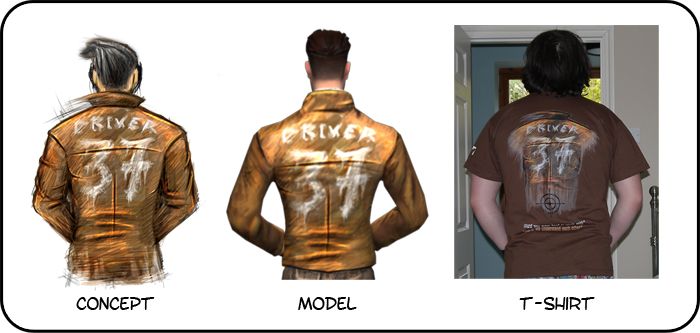
Like my various Stage processes I thought I would do a pretty awesome comparison from concept to model to ME! The image above shows the completed design for the back side of the T-Shirt but also where the design came from. It originated with some "Stage 2" concept art which I spray painted onto my 3D model in ZBrush. I returned to the concept to create the design for the back of my T-Shirt as it is much higher resolution then the model. I still wish they would allow me to cover a T-Shirt with a custom design that way I could make a T-Shirt/Jacket... Oh well..
This is a better shot of the T-Shirt Design, I used a background less PNG image to crop a part of the jacket onto the back of it. I had to rub out/paint the edges of the jacket for it to flow into the T-Shirt. I made the colour of the T-Shirt brown so it would suit the Jacket colour more. There are also another couple of little custom features from the spread shirt website. Particularly the bulls-eye which felt right with the design(for anyone who has read the book "Drive"). I also added a couple of custom quotes and a little old school gamer font on the sleeve with the number "37" for my Driver.
Next the Front which has my low poly games meshes on it in contour render mode (illustrating their wireframe). I kept the colour codes which have been adopted throughout this entire project(The Driver - Orange, The Day Car - Red & the Night Car - Blue). I also fashioned a little custom logo with a bit of a vanishing point road design on it. I wasn't sure at first but I think it really has worked well on this T-Shirt. Part of me was afraid that it wouldn't be noticeable. Still It would have been nice to put the final Render of Drivers face on a Shirt... maybe that's next who knows.
Last but not least a podgy bloke wearing the T-Shirt(image above). I know I don't look too amused in this picture I think I was getting a little tired of taking photographs... There were lots of rejects for this post particularly. Design has never really been a big issue with me its something I came into this degree course already understanding somewhat. I think what I let slip this time was underestimating the time it takes to create something design orientated that is strong. I had the same issue with the Art of... At the end of the day its difficult to say what you include and what you don't...
Sure, when you don't have much work it is easy to say okay I will stretch this into a couple of pages or... I can use this here and that here. Of course when you have a lot of work things become difficult because you cannot really decide what makes the cut. I know that I was so rushed towards the end of this, I just prioritised the final elements. After all everything is shown across the months I have been working on this blog. The T-Shirt got a little side-tracked but I think the back of it is defiantly my most favourite factor. Anyway I hope everyone is doing good!
Got a few of the Maya exercises done but after last week I've been pretty burnt out. I tried to get as many as possible but I didn't really even get to the end of this series... I will look into the rest of these over summer and do them devoid of the grade. They are valuable information and I completely get that. One of the main issues I have been facing has been towards the batch render system in Maya which keeps intermittently cutting my renders short. I have to keep reinitiating the batch render when it stops on random frames... These are just particle scenes mostly... So its not like I can delete the history of them...
Its been rather annoying dealing with this issue, luckily I didn't have that problem with my final turnaround renders for this Unit otherwise I wouldn't have had them to show on D-Day. Once I have done the rest of this series I will post them on this post in addition to the ones I have... Don't see the point of making a new post especially because I want to keep them in the series. I will do the rest of these videos(Dynamics 3 and the lighting ones particularly interest me) as well as the games character (something I'm getting the hang of... I think).
Well lets get onto the beginning of Dynamics Series 2.
The first video is directional control of multiple animated meshes. These are particles but you instance the particles to look like a particular mesh in the scene. I thought that was pretty cool especially since you can load an animation onto one and have it repeat in many. I prefer to think of these meshes as Lego doods, I think that's what I was thinking in one of the earlier Maya classes. Still I had a problem batch rendering this scene there is probably something wrong with my computer or my install of Maya...
Scale control is the alternating scale of sphere instance with a transparent blue texture. The bubbles run along a path which is an emitter is keyed to run along. As emitter sheds more spherical versions of itself an alternating scale control causes the bubbles to differentiate in size giving the illusion of realistic bubbles. There was a blue background on this video but rendering it in my standard .tif format has removed the background (as it does). A relatively cool thing to know, defiantly cool for underwater situations in CG...
The next video is rotating meteor clusters gradually drifting from a centre mass. The video is primarily about the rotation of each meteor which conducts its rotation randomly. The textures meteor shaped model were provided by the tutorial download on our online tutorial site. This video was quite a cool thing to know again particularly with graduating 3D objects. I really find the Dynamics tutorials interesting it would just be nice if I could figure out why the batch render is hating me so much right now....
Next the illusive object index control which randomises multiple meshes from an emitter. In the case of this video we have 4 shapes (in colours blue, red, yellow and blue) which differentiate randomly each time they are played. You can get the same kind of effect with After Effects randomised shapes, I recall doing a tutorial from my expression book which did a 2d scale/position. The real difference here is that you choose the meshes which become random. You could have the same kind of effect with different meteors which would make the video above more real...
The crowd control video (shown above) uses similar conventions to the shape video above and the meteor video above that. In this case however the emitter is a plane where random people shaped meshes appear at each play through of the animation timeline. Its quite cool but I don't like how they all just appear in this video. Would be much cooler if they grew out of the floor like trees (another video in this series). Every single rendition of each model is at a random rotation and random scale which creates a unique proportion every single time...
The next video is all about aim direction arrows which use velocity toe graduate downwards. The particles are instanced to points using the a designed mesh to project the geometry of each particle. The arrows all slightly differentiate but all follow a predetermined gravity field. The velocity is what causes the arrow to curve and fall downwards as a real arrow would. Without the velocity the arrows eject flat and fall flat without any realistic gravity. This is quite a cool thing to know, I'm pretty sure I've seen a 2D rendition of this... I have to wonder if someone used this and drew over it...
Next comes the Rocket video now again this works very much like the aim direction video with the arrows above this video. The key difference is the trails left by these red rockets which have a fog field that graduates them. The colour is also attuned in the settings. There has been some lighting placed in the scene also to give the smoke some realism. Every missile follows a gravity pull and velocity causes the mesh to arch before falling. I do like this video though, pretty cool seeing thousands of missiles going mad... ha-ha.
The rotation types video again functions like the two video above with the velocity and gravity settings. In this case the key difference is in the alternating rotation values of some of the arrows that eject from the object emitter. You will notice that some of the arrows move and look completely vertical, this is because they have been assigned (at random) a place to look at in 3D space. They all are looking at a value of 0,0,0 which is practically in the middle of the viewport in Maya. This is what is known as an expression... They influence most of these dynamics.
Next comes instances and paint effects. The trees in this scene were created using the paint effects in Mayas vast tree library. The terrain has surface deformation which was added by the pushing and pulling of the 3D plane. A texture mask causes the trees not to generate on the path (except for the sampler tree which I forgot to hide in the scene). On that note I will warn everyone that if you are doing an instance to HIDE THE ORIGINAL. It does nothing but sit in the scene if you are not careful. The plane under the grass is meant to be the dirt road...
This is the goldfish video which sees multiple copies of a goldfish be exported through an object emitter. The original fish had an animation set into its key-frames (much like the robot). In this case however a deformer was used across a 30 frame animation causing the fish to look like he is swimming in water. Sadly this video was another case of my batch render not completing. Usually it wouldn't be an issue in Maya as you can just start from a frame it stopped on. When it comes to particles though because it does things randomly the stills wont match up...
Well these are all of the videos I could muster up, sorry there are not more I guess I will have to work on learning them over summer. Apologies go out to Alan there, I guess I burnt myself out on other things... I knew the Maya videos would catch up to me eventually(as they always do). If you do read this Alan and have an idea as to why my batch renderer keeps stopping randomly I would appreciate the aid. I have never had these problems before and now its randomly doing it with every scene I load in... Anyway I'm going to go outside and shut my eyes for a bit!