
There has been a bit of trial and error but I am ready to get a few of the night cars final developments up and on the blog. I am a bit behind on my post its mainly because I have been learning the true process for bringing things in and out of ZBrush. As it turns out one of the ways I have been doing things was wrong which would see me going back and having to retexture my entire night car model again. I haven't done that but I did get the UVs laid out which in itself took a while mainly due to their weird way of unwrapping... The process took longer for some geometry sadly..
Anyway I am at a stage now where I can post a few updates the few which I intend to do for each model as and when. This weekend will primarily be committed to the day car only purely because its the only thing I have yet to take further. I will be painting and normal mapping the night car once again probably tomorrow. Saturday and Sunday are primarily the Day Cars turn mainly because I still have to build it and get the uvs sorted on that for me to finally be able to move on. I may have to focus less on the environment as I was going to but Ill put something together in the spur of the moment...
Anyway lets get down to the nasty UV Mapping :P
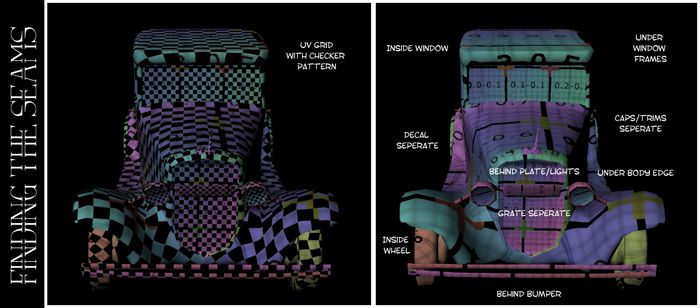
My "Finding the Seams" image is mainly about where I placed the edges of my UV Maps as everyone knows it is advisable to hide them as best as one can. I found myself breaking the model into lots of parts to make it easier to colour. I will probably re-join it all once I have the texture and normal laid out over it. I have been playing with ambient occlusion baking as well to provide my model with a little extra light depth. I am learning as I go but so far I think I have the battle plan going forward...
Next comes the inevitable ZUV layout mainly because I think its cool to be able to see your geometry transform into the UVs. This is quite a cool way of seeing what is what just in case anybody was wondering. I have learnt a number of things by going into ZBrush for this project and I have some understanding now of the order of events. Basically its a foundation you cant just bring an unwrapped model in unless you want aggro. The model needs its UVs and ideally it needs to be one mesh so you can divide it. You then poly-group the mesh into parts in ZBrush and reattach them later in Maya.

Next comes the car in the viewport just for people to ogle at really the viewports range very differently between Maya and ZBrush. More importantly you have to take every material in ZBrush with a "pinch of salt". Its an illusion and you cannot export it which is why things tend to look weird when you bring them from ZBrush. Ultimately I think the real trick here is just a learning process like anything. The car wrapped quite nicely though as you can tell from the seems, there were issues in getting some parts to listen there was constant overlapping...
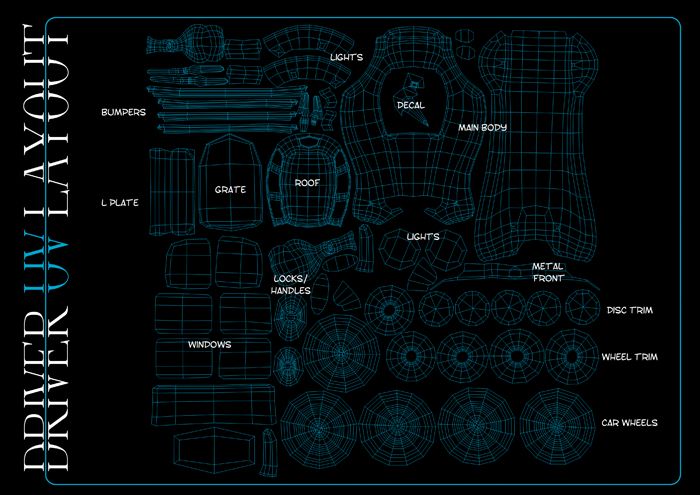
Last but not least the UV Layout in all its glory, I think its quite fair to say that this one is a bit more crowded. I prioritized the size of the body mainly because that's the first thing one draws their eyes to. The car wheels were also bigger then I had originally planned mainly because I wanted quite a bit of rust inside there. I think the geometry that took the longest was the door handles and bumpers purely because the Geometry refused to unwrap without overlapping itself. I think I spent a day on one bumper and a door handle that's how long they took...
This car has been a bit of a love hate relationship and I have to go over it again. I think the painting will be enjoyable now that I know I was doing everything wrong before. I will also take these final few seconds to inform people who viewed my "Stage 3 Concept" post to tell them that that rendition of the night car was a Concept. This in no way reflects how the final model will look once I have it doing a turnaround in Maya. For those of you that know me know I love Dark Concept its my thing and there was a range of colour in there. Personally I liked the concept it produced... It didn't work against a bright background so that's a given.... but I liked how the car was coloured.
Well I have a few other posts to knock up so I will love you and leave you.
xXStItChXx
No comments:
Post a Comment