Hello
Everyone,
This is the first of many Car updates which have been delayed but I guess at least they are starting to materialize now. I am a little dissapointed there wasn't time for more alterations of the cars proportionally but it's one of those things I didn't prepare for when utilizing my time. Still at least there are 6 variants of the car to show that I was thinking about
"other" options... not just the set standard design. I also did not know how far to push the exaggerated features.
Doing it too little will make it virtually un-noticable you only really notice changes when you push the boat out to severely differentiate it from the original.
From my discussions with Alan we discussed exaggerating the features slightly which I was more then happy to do.
Of course when applying it I realized it didn't make a massive difference unless I severely altered them. If anybody reading this post thinks one version is better then the other please let me know so I can be more selective nearer the time (like the heads). I will be doin this for the day car and dare I say it with some of the environment stuff I will be playing with shortly. I am aiming to have the stage 1's of these done today even if I lose sleep, fallen even further behind due to a few issues at home
.... oh well.
The Stage 1 Development for the "Night Car" is below... Enjoy!
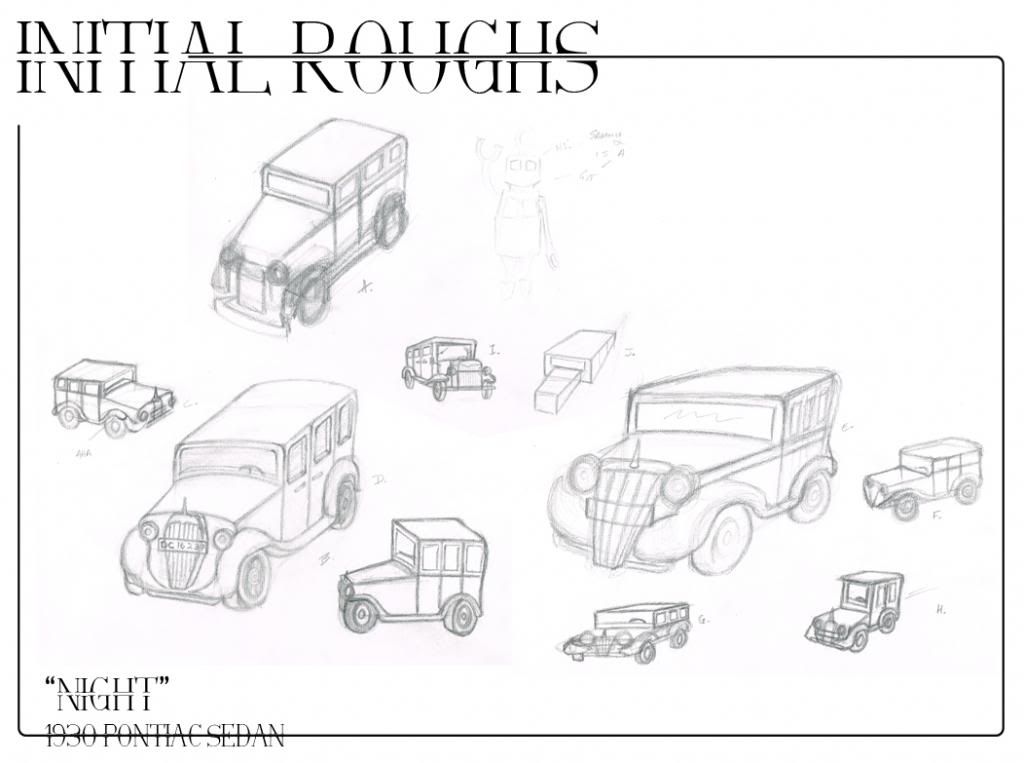
My initial roughs were mostly wrong to start with, I was having a job understanding the shapes that built the vehicle. I knew it was boxy which I am glad to say is the component I kept getting right, the curves were the difficult thing to place. W
hen I understood it a little more I started stretching and squashing some of the features - this was mostly inspired by the Wacky Races cars, I have no idea why I thought that would work here but I thought I'd give it a shot. Also you probably cannot see it well but Sammy drew a robot on my page during the Maya class so thank you again for that Sammy....grrrrr.
Next I focused particularly on reference imagery just to get the details as accurate as possible, the reference image I took was perfect for an old beaten 1929 sedan. The real trick was using perspective lines to identify its placement which I haven't done in quite a while. The car was just too big to get accurate without them really, an object as large as a car needs a grid. Once I had my sketch I knew roughly what primitive shapes were used to construct it.
The key features I discussed altering with Alan were predominantly the wheels and the lights. Of course in my projections I altered the body too and the front rail.
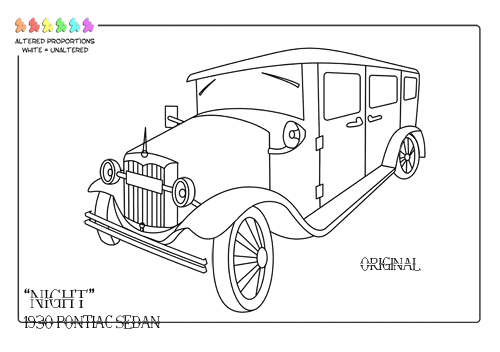
From the final sketch I Inked and created the Blank original in the top right of the image above. "Alternate 1" was born from me altering the size of the lights and the wheels.
"Alternate 2" was from shrinking the lights and stretching the wheels, I also altered the body by squashing it slightly.
The roof was also extended in addition to the front Decal of the car. "Alt 3" came from increasing the base of the wheels and the size of the lights, the roof was jumped a little higher as was the front rail. "Alt 4" was created using lots of Skew functions particularly on the lights and the front decal.
"Alt 5" was made using lots of squash almost ridding the size of passenger compartment...
I am a little torn between the "Original" and "Alt 2" they are the best in my opinion.
Last but not least I created a small animation of the 6 variants of car that materialized from my original.
The colored sections on the cars are the parts I altered so people could distinguish the originals features from what was changed. That's only if it wasn't obvious that the car variants looked different from each other. I did a similar thing with my proportion studies for the Driver himself, it took a little longer to get the car ones off the ground.
People should not worry for when it comes to color I will be using darker blacks and if I can a little rust as my reference imagery suggests.
With my proportions for this car explored next I plan to get involved with the color choices and maybe arranging some of the details that the car will eventually have (this is stage 2). From there I will do one final image which will be my stage 3 - these will be done for both cars then I will get involved with the turnarounds to finally be where everyone else is at this stage - modelling.
I had planned to be further ahead by now but don't worry I know it so I will do what I have to to catch up with everyone else. I had written off Easter anyway so I will have time to do the leg work and return with some time.
Hope everyone is doing good out there!
xXStItChXx


No comments:
Post a Comment