
I thought I would get this up here before calling it a night, I had my UV's for the Day Car done yesterday but wanted to get my other posts on the web before hand. I stock them up and fire them off in an order... my madness is all about order. Anyway this car was much easier to unwrap it was probably due to my planar mapping this time round. I made the Y axis -90 on the UV projection so it would look at the planar UV's from above. This actually saved me a lot of time.... Then of course you have the placing of the seams which is the most important aspect of UV mapping...
The problem is always with overlapping when it comes to UV mapping, you can stretch a UV and it will stretch to the bounds of the polygon space it covers. The trick is doing it without it going over other UVs on your geometry. You have to unfold the UV to the point that there is nothing more to unfold and yet you cannot let it hit other UVs. This is a constant battle between "Relaxing" and "Unfolding"... I think in the case of the Day car nothing was backwards... If your UVs are backwards they have to flip inside out and a lot of the time this causes is to ball up and lock into a mess...
Sorry for waffling but I had to get that out of my convoluted mind...
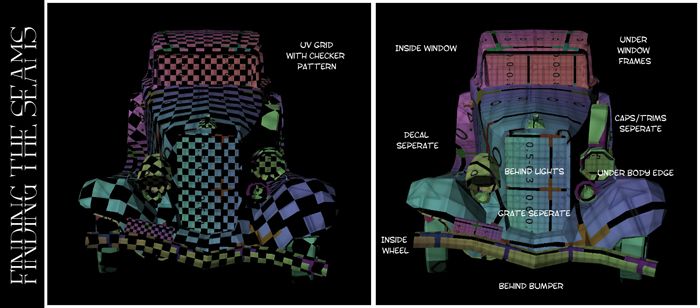
"Finding the Seams" is largely about the placement of the UV maps seams. I use the UV grid texture with a checker multiply to identify the UV tiles and their seams. The image to the right identifies the areas where I have placed the seams. They are similar to the locations where I put the "Night" seams in their respective UV post. I figured way back when it was time to start taking account of where one places seams on a 3D model. I will probably continue to do this for all future models, its good practice and it helps me learn any mistakes made (if any)...
Next is my standard ZUV video, a little trick I noticed when playing with UV's in ZBrush. It basically turns the 3D model into its UV shape/coordinates. Its really cool to see how your UV's look as physical shells... allowing the viewer to rotate round them and see their mesh become what they are on the tile. Each time I paint onto 3D geometry and choose the "New from Poly-paint" button my paint is projected onto the UV shells. This is viewable in ZBrush the exact same way that the UV video demonstrates their physical placement on the UV grid.

Next is the Day car in Maya's viewport, this is mainly because renders have a tendency to polish and hide certain things that the viewport doesn't. An exceptional case in point is the selection wire and the grid. While I am sure there are ways to render these out, I will use the screen dump method until I learn that little trick ha-ha. I am quite happy with the geometry of this model as it works out substantially lower then my other models. Come to think of it I think my "Driver" model is now probably the largest clocking in at 4000 poly, the Night Car is 3800 odd and the Day Car is about 3200...
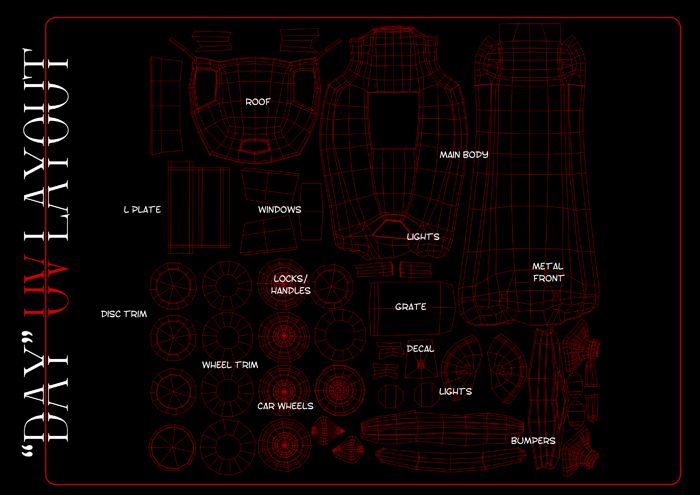
Last but not least is the "Day UV Layout" (shown above) where I have listed what the particular shells are in the scheme of the entire "Day Car Model". In this case there are less windows and less door handles (which were a pain in the ass on the Night Model). The wheels were probably the easiest to unwrap with the bumpers being a little more complex. To be honest this model was a much better experience. If I recall for the Night Car it took an entire day just to correctly unwrap a door handle and a bumper. I think this was because the geometry was inverted, not sure though...
Well the next phase for this model will be getting the textures on and some ambient maps baked out. The texturing process is generally quite long but hopefully I should have a good end result by D-Day. The Driver will hopefully be getting finalized tomorrow. The post its are getting smaller and smaller but so is the countdown till D-Day. There are a total of 15 post its remaining and the majority of those will be individual posts on this blog. I am not sure yet how I will be doing the final turn arounds it may be best just to make a you-tube clip... still I am liking the animated gifs...
Anyway I think that does it for this post.
xXStItChXx
No comments:
Post a Comment